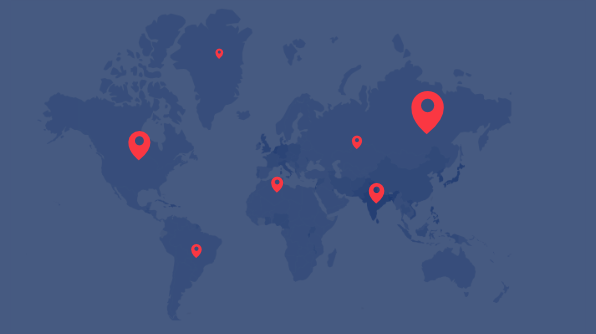
The maps control for Essential JS 2 is used to visualize geographical data and represent statistical data of a particular geographic region on Earth. It includes functionalities such as data binding, legends, markers, data labels, tooltips, zooming, and panning. Some of its advanced features include projections, bubbles, animation, color mapping, annotations, navigation lines, and more.
This blog post explores the Syncfusion maps control in Essential JS 2, which allows you to render shapes from provided GeoJSON data. We are going to render a real-time world map and represent the permanent and non-permanent countries in the United Nations Security Council for the year 2017 with various colors, titles, subtitles, legends, and tooltips. The following screenshot depicts the map we will build in this blog.
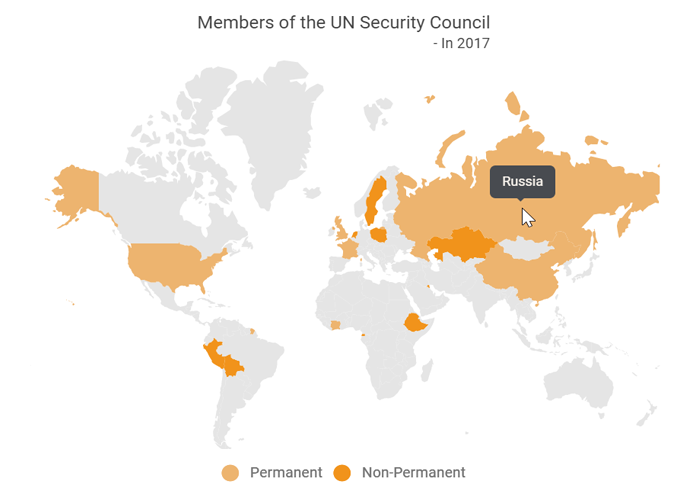
Map information sourced from Wikipedia
Installation and configuration
The maps control can be configured in TypeScript as follows:
- Clone the Essential JS 2 quick-start seed repository, and configure the drop-down package in the system.config.js file.
"@syncfusion/ej2-base": "syncfusion:ej2-base/dist/ej2-base.umd.min.js",
"@syncfusion/ej2-data": "syncfusion:ej2-data/dist/ej2-data.umd.min.js",
"@syncfusion/ej2-buttons": "syncfusion:ej2-buttons/dist/ej2-buttons.umd.min.js",
"@syncfusion/ej2-popups": "syncfusion:ej2-popups/dist/ej2-popups.umd.min.js",
"@syncfusion/ej2-maps": "syncfusion:ej2-maps/dist/ej2-maps.umd.min.js",
"@syncfusion/ej2-pdf-export": "syncfusion:ej2-pdf-export/dist/ej2-pdf-export.umd.min.js",
"@syncfusion/ej2-compression": "syncfusion:ej2-compression/dist/ej2-compression.umd.min.js",
"@syncfusion/ej2-file-utils": "syncfusion:ej2-file-utils/dist/ej2-file-utils.umd.min.js"
- Install the NPM packages by using the following command.
$ npm install
- Add the HTML input element that needs to be initialized as a component in the index.html file.
- Initialize the component in the app.ts file as shown in the following code.
import { Maps } from '@syncfusion/ej2-maps';
// initialize maps component
let map: Maps = new Maps();
// render initialized maps
map.appendTo('#container');
Configuring maps with GeoJSON data
After creating the maps component, bind the shape data to render the shapes. Any GeoJSON data can be specified as shape data.
export let World_Map: Object =
    {
        "type": "FeatureCollection",
        "crs": { "type": "name", "properties": { "name": "urn:ogc:def:crs:OGC:1.3:CRS84" } },
        "features": [
           { "type": "Feature", "properties": { "admin": "Afghanistan", "name": "Afghanistan", "continent": "Asia" }, "geometry": { "type": "Polygon", "coordinates": [[[61.21081709172573, 35.650072333309218], [62.230651483005879, 35.270663967422287],
            //..
            ]]}},
            //..
           ]
    };
A map built with the maps control is composed of layers, and can accommodate one or more layers. Shape data is bound to maps using the shapeData property in layers.
import { Maps } from '@syncfusion/ej2-maps';
let maps: Maps = new Maps({
    layers: [
        {
            shapeData: World_Map
        }
    ]
});
Bind data source
Define an array of JavaScript objects as a data source to the maps control. This data source will be further used to color the map, display data labels, display tooltips, and more. Assign this to the dataSource property in layers.
export let unCountries: object[] = [
    { Country: 'China', Membership: 'Permanent' },
    { Country: 'France', Membership: 'Permanent' },
    { Country: 'Russia', Membership: 'Permanent' },
    { Country: 'United Kingdom', Membership: 'Permanent' },
    { Country: 'United States', Membership: 'Permanent' },
    { Country: 'Bolivia', Membership: 'Non-Permanent' },
    { Country: 'Eq. Guinea', Membership: 'Non-Permanent' },
    { Country: 'Ethiopia', Membership: 'Non-Permanent' },
    { Country: 'Ivory Coast', Membership: 'Permanent' },
    { Country: 'Kazakhstan', Membership: 'Non-Permanent' },
    { Country: 'Kuwait', Membership: 'Non-Permanent' },
    { Country: 'Netherlands', Membership: 'Non-Permanent' },
    { Country: 'Peru', Membership: 'Non-Permanent' },
    { Country: 'Poland', Membership: 'Non-Permanent' },
    { Country: 'Sweden', Membership: 'Non-Permanent' }
];
You should also specify the field names in the shape data and data source to the shapePropertyPath and shapeDataPath properties, respectively. These are used to identify the appropriate shapes and match the specific data source values to them.
For example, consider the color value specified in the data source and the field names specified in shapePropertyPath and shapeDataPath have the same value: ‘Australia’. That color will be applied to the Australia shape.
import { Maps } from '@syncfusion/ej2-maps';
let maps: Maps = new Maps({
    layers: [
        {
            shapeData: World_Map,
            dataSource: unCountries,
            shapePropertyPath: 'name',
            shapeDataPath: 'Country'
        }
    ]
});
Mapping colors
The desired fill colors can be directly specified for shapes. You can also apply colors based on the desired conditions. Here, the field that is used for comparison is specified in the colorValuePath property. If the value of a shape is ‘Permanent’, then the color ‘#EDB46F’ will be applied to the shape. If the value of the shape is ‘Non-Permanent’, the color ‘#F1931B’ will be applied.
import { Maps } from '@syncfusion/ej2-maps';
let maps: Maps = new Maps({
    layers: [
        {
            shapeData: World_Map,
            dataSource: unCountries,
            shapeDataPath: 'Country',
            shapePropertyPath: 'name',
            shapeSettings: {
                fill: '#E5E5E5',
                colorValuePath: 'Membership',
                colorMapping: [
                    {
                        value: 'Permanent',
                        color: '#EDB46F'
                    },
                    {
                        value: 'Non-Permanent',
                        color: '#F1931B'
                    }
                ]
            }
        }
    ]
});
Define title and subtitle
Specify the appropriate title and subtitle to portray additional information about the map. This can be done by specifying string values to the text property in titleSettings and subtitleSettings.
import { Maps } from '@syncfusion/ej2-maps';
let maps: Maps = new Maps({
    titleSettings: {
        text: 'Members of the UN Security Council',
        subtitleSettings: {
            text: '- In 2017',
            textAlignment: 'Far'
        }
    }
});
Display legend
Legend items are rendered based on the color mapping values. In our example, this means the legend will be displayed based on the ‘Permanent’ and ‘Non-Permanent’ values specified in the color mapping. You can display the map legend by setting the visible property to true in legendSettings.
import { Maps, Legend } from '@syncfusion/ej2-maps';
Maps.Inject(Legend);
let maps: Maps = new Maps({
    legendSettings: {
        visible: true
    }
});
Enable tooltips
Tooltips can be enabled to display additional information about shapes when the pointer hovers over them. The values displayed in a tooltip can be retrieved from the data source by specifying the data source’s field name in the valuePath property and setting the visible property to true in tooltipSettings.
import { Maps, MapsTooltip} from '@syncfusion/ej2-maps';
Maps.Inject(MapsTooltip);
let maps: Maps = new Maps({
    layers: [
        {
            tooltipSettings: {
                visible: true,
                valuePath: 'Country'
            }
        }
    ]
});
The complete sample code is as follows.
import { Maps, Legend, MapsTooltip } from '@syncfusion/ej2-maps';
import {World_Map} from './WorldMap';
Maps.Inject(Legend, MapsTooltip);

export let unCountries: object[] = [
    { Country: 'China', Membership: 'Permanent' },
    { Country: 'France', Membership: 'Permanent' },
    { Country: 'Russia', Membership: 'Permanent' },
    { Country: 'United Kingdom', Membership: 'Permanent' },
    { Country: 'United States', Membership: 'Permanent' },
    { Country: 'Bolivia', Membership: 'Non-Permanent' },
    { Country: 'Eq. Guinea', Membership: 'Non-Permanent' },
    { Country: 'Ethiopia', Membership: 'Non-Permanent' },
    { Country: 'Ivory Coast', Membership: 'Permanent' },
    { Country: 'Kazakhstan', Membership: 'Non-Permanent' },
    { Country: 'Kuwait', Membership: 'Non-Permanent' },
    { Country: 'Netherlands', Membership: 'Non-Permanent' },
    { Country: 'Peru', Membership: 'Non-Permanent' },
    { Country: 'Poland', Membership: 'Non-Permanent' },
    { Country: 'Sweden', Membership: 'Non-Permanent' }
];

// initialize Maps component
let map: Maps = new Maps({
    titleSettings: {
        text: 'Members of the UN Security Council',
        subtitleSettings: {
            text: '- In 2017',
            alignment: 'Far'
        }
    },
    legendSettings: {
        visible: true
    },
    layers: [
        {
            shapeData: World_Map,
            dataSource : unCountries,
            shapePropertyPath: 'name',
            shapeDataPath: 'Country',
            tooltipSettings: {
                visible: true,
                valuePath: 'Country'
            },
            shapeSettings: {
                fill: '#E5E5E5',
                colorValuePath: 'Membership',
                colorMapping: [
                    {
                        value: 'Permanent',
                        color: '#EDB46F'
                    },
                    {
                        color: '#F1931B',
                        value: 'Non-Permanent'
                    }
                ]
            }
        }
    ]
});

// render initialized Map
map.appendTo('#container');
An interactive version of this sample is available on StackBlitz: https://stackblitz.com/edit/wvprqu?file=index.ts
Conclusion
In this blog, we hope that you have learned how to create a simple map and enhance its basic features. The maps control has many advanced features, such as rendering for other map providers, custom shapes, projections, markers, data labels, bubbles, animations, navigation lines, and user-interactive features such as zooming and panning, selection, highlighting, and drill-down. In future blogs we will see how easy it is to configure some of these advanced features.
If you have any questions or need any clarifications, please let us know in the comments section below. You can also contact us through our support forum or Direct-Trac. We are always happy to assist you!
Helpful links
GitHub source: https://github.com/syncfusion/ej2-javascript-ui-controls/tree/master/controls/maps
Interactive maps demos: https://ej2.syncfusion.com/demos/#/material/maps/default.html
Essential JS 2 maps documentation: https://ej2.syncfusion.com/documentation/maps/?lang=typescript


