Syncfusion’s Xamarin.Forms List View component is used to display a list of data in a predefined or customized view. It offers high performance when bound with commonly used data sources. Data can be grouped, sorted, and filtered with ease. Key features include different layouts, item templating, swiping, horizontal orientation, item drag and drop, sticky headers and footers, and selection with different modes and gestures.
This blog post will explore the advantages of the Syncfusion list view component over the Xamarin.Forms framework list view, and then show how easy it is to get started with the Syncfusion list view.
Advantages of Syncfusion list view over Xamarin list view
The Syncfusion list view will make your development easier with its rich set of features and functionalities. The following are some feature advantages the Syncfusion list view has over the Xamarin.Forms framework list view.
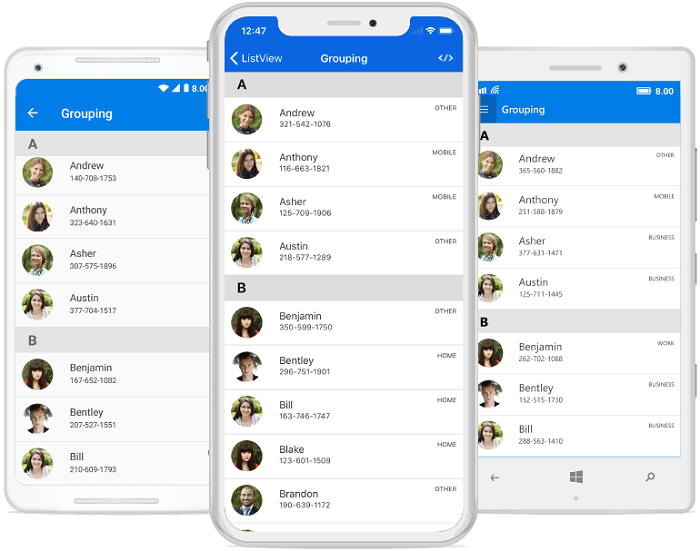
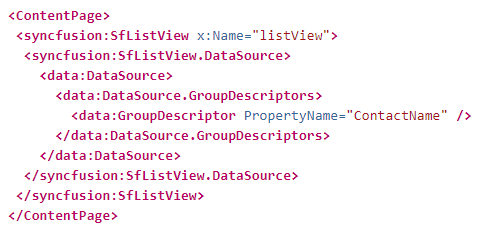
- Grouping: Group list items by setting the GroupDescriptor property in one line of code without having to make any changes in your ViewModel.
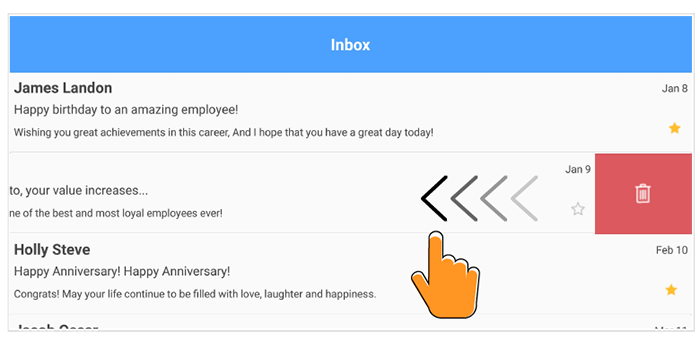
- Swiping: Swipe list items left or right. The swipe views can be customized to be associated with custom actions.
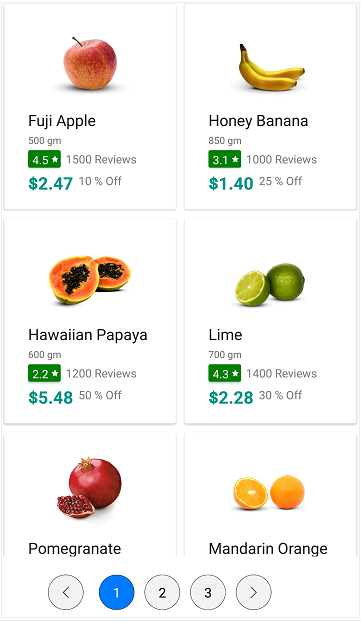
- Grid layout: Display list data in a predefined number of columns. This allows items to be displayed in a single column on smaller screens, or multiple columns on wider screens.

- Horizontal orientation: Display list items vertically or horizontally. In a horizontal orientation, items are arranged horizontally and can be scrolled horizontally.
- Filtering: Filter list items and display only those users need. Dynamic filtering is also supported.
- Sorting: Display list items in either ascending or descending order. Also allows items to be sorted with custom logic.
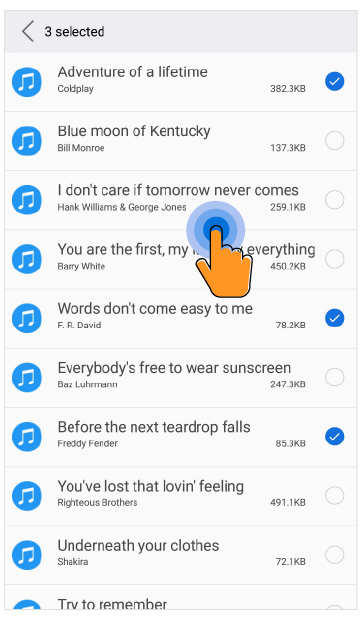
- Multiselection: Select more than one item in the list simultaneously. Different selection modes and selection gestures are also supported. The appearance of selected items can be customized easily.
- Load more: Load more data at run time automatically or manually when reaching the end of the list. This feature helps improve the initial loading speed by minimizing data. Also, the loading indicator and load more button can be customized.
- Built-in row drag and drop: Reorder list items by dragging them either with a long press or through a drag indicator view. The drag appearance of an item can be customized.
- Paging: List view items can be arranged across pages using the data pager control, which helps when interactively manipulating the data.
- Sticky header and footer: Header and footer items can be added to the list view. They can be frozen in place or scroll with the view. The Syncfusion list view also supports sticky group headers, where you can freeze a group header in the view until its items are scrolled out of view.
Besides these, the Syncfusion list view component for Xamarin.Forms supports all the other features in the Xamarin.Forms framework list view, such as grouping, autofitting items, pull to refresh, data binding to various item sources, custom sorting, custom grouping, item size customization, and more.
Getting Started with Syncfusion List View
Next, we will take a quick look at getting started with the Syncfusion list view component for Xamarin.Forms and walk through the process of creating a real-world scenario for it. These are the steps to get started:
- Configure the list view.
- Configure the list view with data.
- Define item templates.
Configuring the list view
NuGet package
First, create a Xamarin.Forms project and add the Syncfusion.Xamarin.SfListView NuGet package to the solution to install the necessary package and renderer assemblies for each platform.
Creating a cross-platform app
Step 1
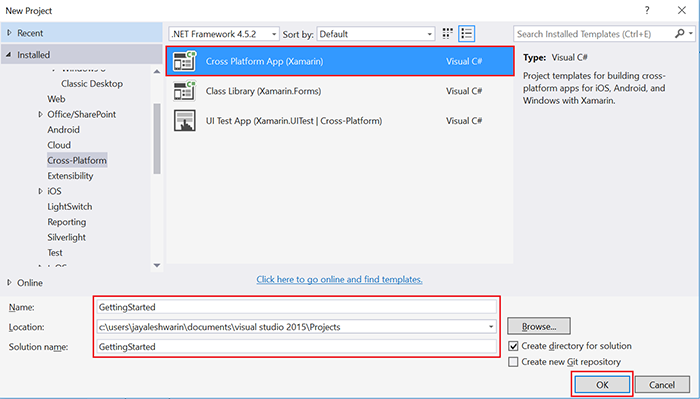
Create a new cross-platform project as follows:
- Open Visual Studio.
- Choose Create New Project.
- Select Templates > Visual C# > Cross-Platform > Cross Platform App (Xamarin).
- Provide a project Name and project Location.
- Click OK.
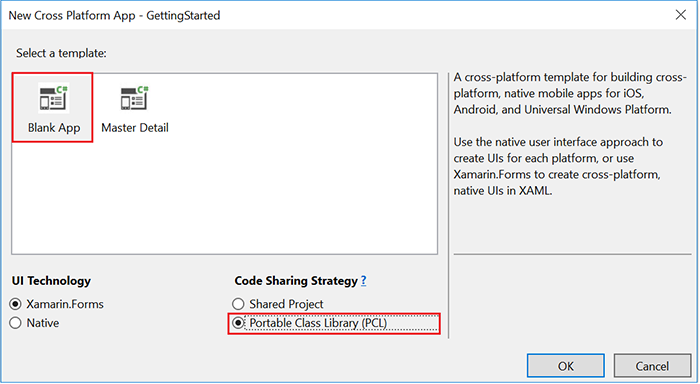
Step 2
A new window will appear. Here, select the Blank App template, the Xamarin.Forms option under UI Technology, and Portable Class Library (PCL) under Code Sharing Strategy.
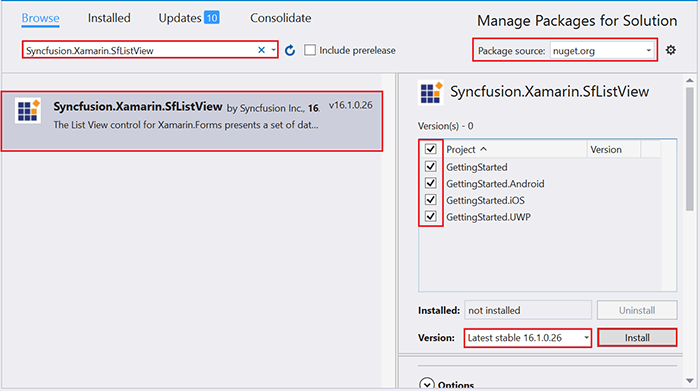
Step 3
After creating the project, we need to add the NuGet packages. Right-click the project name in Solution Explorer and select Manage NuGet Packages. Search for Syncfusion.Xamarin.SfListView, and then install it.
Creating the list view
The list view component is entirely configurable in both XAML and code behind. Import the SfListView control namespace in your XAML page and add the SfListView control to the ContentPage or as a nested child based on your requirements.
<?xml version="1.0" encoding="utf-8" ?>
<ContentPage >="http://xamarin.com/schemas/2014/forms"
             >:x="http://schemas.microsoft.com/winfx/2009/xaml"
             >:syncfusion="clr-namespace:Syncfusion.ListView.XForms;assembly=Syncfusion.SfListView.XForms"
             >:local="clr-namespace:SfListViewApp"
             x:Class=" SfListViewApp.MainPage">

        <syncfusion:SfListView x:Name="listView" />
</ContentPage>
Launching the list view on each platform
In Android, the list view will be launched without any further initialization. An additional step is required for launching the list view in iOS and UWP.
iOS project
After the Xamarin.Forms framework initializes and before LoadApplication is called, call the SfListViewRenderer.Init() method in the FinishedLaunching overridden method of the AppDelegate class, as demonstrated in the following code example.
public override bool FinishedLaunching(UIApplication
app, NSDictionary options)
{
   ...

Xamarin.Forms.Forms.Init();

Syncfusion.ListView.XForms.iOS.SfListViewRenderer.Init();

LoadApplication(new App());
   ...
}
UWP project
Call the SfListViewRenderer.Init() method in the MainPage constructor before LoadApplication is called, as demonstrated in the following code example.
public MainPage()
{
    ...

Syncfusion.ListView.XForms.UWP.SfListViewRenderer.Init();

LoadApplication(new App());
    ...
}
For UWP, one additional step is required if the project is built in release mode with the .NET Native tool chain enabled because reflection is used internally for sorting, grouping, and filtering features in the DataSource class. However, the issue can be solved at the application level by adding the following directives in the Default.rd.xml file in the application of the UWP project.
<Directives >="http://schemas.microsoft.com/netfx/2013/01/metadata">
  <Library Name="Syncfusion.DataSource.Portable">
    <Type Name="System.Linq.EnumerableExecutor{System.Int32}" Dynamic="Required Public" />
    <Type Name="System.Collections.ObjectModel.ObservableCollection{}" Dynamic="Required Public" />
    <Namespace Name="System.Linq" Dynamic="Required All" />
  </Library>
</Directives>
Configuring list view with data
List view is a data-bound control. Therefore, you must create a data model to bind to it.
In our example, a simple shopping category has been modeled that generates a list of shopping categories with a description and image for each category. In a real-world scenario, you can also bind the data from services and databases to render the list view based on your requirements.
Model class with properties
public class ListViewShoppingCategoryInfo
: INotifyPropertyChanged
{
    private string categoryName;
    private string categoryDesc;
    private ImageSource categoryImage;

    public string CategoryName
    {
        get { return categoryName; }
        set
        {
            categoryName = value;
            OnPropertyChanged("CategoryName");
        }
    }

    public string CategoryDescription
    {
        get { return categoryDesc; }
        set
        {
            categoryDesc = value;
            OnPropertyChanged("CategoryDescription");
        }
    }

    public ImageSource CategoryImage
    {
        get { return categoryImage; }
        set
        {
            categoryImage = value;
            OnPropertyChanged("CategoryImage");
        }
    }

    public event PropertyChangedEventHandler PropertyChanged;

    private void OnPropertyChanged(string
name)
    {
        if (this.PropertyChanged != null)
            this.PropertyChanged(this,
new PropertyChangedEventArgs(name));
    }
}
Populating the model collection
public class ShoppingCategoryInfoRepository
{
    internal
ObservableCollection<ListViewShoppingCategoryInfo> GetCategoryInfo()
    {
        var categoryInfo = new
ObservableCollection<ListViewShoppingCategoryInfo>();

        for (int i = 0; i < CategoryNames.Count(); i++)
        {
            var
info = new ListViewShoppingCategoryInfo()
            {
                CategoryName =
CategoryNames[i],
                CategoryDescription =
CategoryDescriptions[i],
                CategoryImage =
ImageSource.FromResource("SfListViewApp.Icons."
+ CategoryNames[i] + ".jpg")
            };
            categoryInfo.Add(info);
        }
        return categoryInfo;
    }

    string[] CategoryNames = new string[]
    {
        "Fashion",
        "Electronics",
        "Home & Kitchen",
        "Sports & Health",
        "Kids",
        "Books",
        "Footwear",
        "Mobile & Accessories",
        "Flower Gift Cakes",
        "Watches",
        "Jewelry",
        "Food",
        "Perfumes",
        "Movies & Music",
        "Cameras
& Optics"
    };

    string[] CategoryDescriptions = new string[]
    {
        "Latest fashion trends in online shopping for
branded Shoes, Clothing, Dresses, Handbags, Watches, and Home Decor for Men
& Women...",
        "Shop variety of electronics like Mobiles,
Laptops, Tablets, Cameras, Gaming Consoles, TVs, LEDs, Music Systems, and much
more...",
        "Purchase home & kitchen accessories like
Cookware, Home Cleaning, Furniture, Dining Accessories, Showcase accessories,
etc...",
        "Buy
accessories for Badminton, Cricket, Football, Swimming, Sports shoes, Tennis,
Gym, Volleyball, and Hockey at the lowest price...",
        "Shop for clothing for boys, girls, and babies.
Explore the range of Tops, Tees, Jeans, Shirts, Trousers, Skirts, Body
Suits...",
        "Purchase books across various categories at the
lowest price. Read books online and download as PDF...",
        "Buy Footwear for Men, Women, and Kids,
including Formal Shoes, Slippers, Casual Shoes, Sandals, and more at the best
price...",
        "Buy branded Mobile Phones, Smartphones,
Tablets, and Mobile Accessories like Headsets, Memory Cards, Chargers, Covers,
etc...",
        "Buy different Flowers, Gifts, and Cakes
online. Birthday Gifts, Anniversary Gifts, Mother’s Day Gifts, Flowers and
Cakes etc...",
        "Latest range of trendy Digital Watches, Analog
Watches, Digital Steel Watches, Digital LED Watches for Men and Women...",
        "Buy Jewelry for Men, Women, and Children from
brands like Gitanjali, Tara, Orra, Sia Art Jewelry, Addons, Ayesha, Peora,
etc...",
        "Shop from a wide range of best quality Fruits,
Vegetables, Health Foods, Indian Grocery, Cereals, Noodles, Foods etc...",
        "Choose the best branded perfumes like Azzaro,
Davidoff, CK, Axes, Good Morning, Hugo Boss, Jaguar, Calvin Klein, Antonio
etc...",
        "Buy a variety of Movies & TV on Blu-ray in
different languages, and Music in a variety of formats like audio CD, DVD, MP3,
VCD, etc...",
        "Purchase a variety of cameras like Tamron,
Sigma, Nikon, Sony, and Canon, and SLRs, Lenses, and Optics accessories at the best
prices..."
    };
}
Configure the populated data or data from services or databases to a collection in the ViewModel. The collection can be any commonly preferred data source. I prefer ObservableCollection overall for its internal INotifyCollectionChanged implementation, as we generally expect the list view to be responsive. If collection changes are not a concern, then a generic List<T> can be used to hold the data, which is faster than the ObservableCollection.
public class ListViewViewModel
{
    private
ObservableCollection<ListViewShoppingCategoryInfo> categoryList;

    public ListViewViewModel()
    {
        GenerateSource();
    }

    public
ObservableCollection<ListViewShoppingCategoryInfo> CategoryList
    {
        get { return categoryList; }
        set { this.categoryList = value; }
    }

    private void GenerateSource()
    {
        ShoppingCategoryInfoRepository
categoryinfo = new ShoppingCategoryInfoRepository();
        categoryList =
categoryinfo.GetCategoryInfo();
    }
}
Binding data to list view
To bind the data source to the list view, set the view model as the binding context of the page and bind the collection containing the data in your view model to the SfListView.ItemsSource property as shown in the following example.
<?xml
version="1.0" encoding="utf-8" ?>
<ContentPage
>="http://xamarin.com/schemas/2014/forms"
             >:x="http://schemas.microsoft.com/winfx/2009/xaml"
             >:syncfusion="clr-namespace:Syncfusion.ListView.XForms;assembly=Syncfusion.SfListView.XForms"
             >:local="clr-namespace:SfListViewApp"
             x:Class=" SfListViewApp.MainPage">

    < ContentPage.BindingContext>
        <local:ListViewGettingStartedViewModel/>
    </ContentPage.BindingContext>

        <syncfusion:SfListView x:Name="listView" ItemsSource="{Binding
CategoryList}"/>

</ContentPage>
Defining item templates
By defining the SfListView.ItemTemplate of the list view, a custom user interface can be put in place to display the data items.
<syncfusion:SfListView x:Name="listView"
ItemsSource="{Binding CategoryList}"
                 ItemSize="160" >
    <syncfusion:SfListView.ItemTemplate>
        <DataTemplate>
            <Frame
BackgroundColor="White" Padding="1">
                <Grid>
                    <Grid.ColumnDefinitions>
                        <ColumnDefinition
Width="0.35*"/>
                        <ColumnDefinition
Width="0.65*"/>
                    </Grid.ColumnDefinitions>

                    <Image
Source="{Binding CategoryImage}"
                           HorizontalOptions="FillAndExpand"
                           VerticalOptions="FillAndExpand"/>

                    <Grid
Grid.Column="1" Padding="10,0,0,0">
                        <Grid.RowDefinitions>
                            <RowDefinition
Height="Auto"/>
                            <RowDefinition
Height="*"/>
                        </Grid.RowDefinitions>

                        <Label Text="{Binding
CategoryName}" FontSize="Medium"
                               LineBreakMode="WordWrap"
FontAttributes="Bold"/>

                        <Label
Grid.Row="1" Text="{Binding CategoryDescription}"
                               LineBreakMode="WordWrap"
FontSize="Small" />
                    </Grid>
                </Grid>
            </Frame>
        </DataTemplate>
    </syncfusion:SfListView.ItemTemplate>
</syncfusion:SfListView>
This completes configuring a simple list view in an application. Running the sample after following the previous steps will render a shopping category list in your view as shown in the following screenshot.
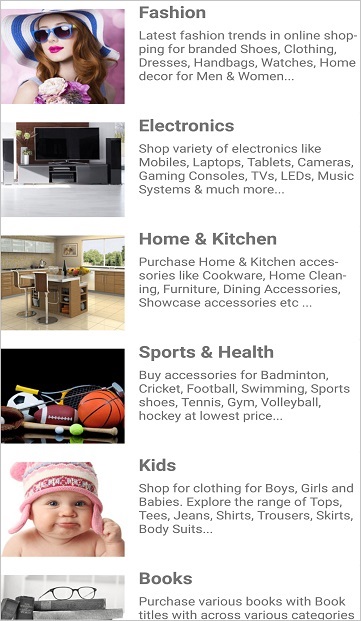
The complete sample can be downloaded here.
Summary
In this post, we have learned about creating and configuring the list view component with data, and the advantages of the Syncfusion List View component for Xamarin.Forms over the Xamarin.Forms framework list view. We hope you enjoyed the blog, and if you would like to try the list view component for yourself, download our trial setup, explore the demos for iOS, UWP, and Android, and peruse the documentation. If you have any questions, you can post them in our community forums or in our Direct-Trac support system.
If you like this blog post, we think you’ll also like the following free e-books:
- Xamarin.Forms Succinctly
- Xamarin.Forms for macOS Succinctly
- UWP Succinctly
- Writing Native Mobile Apps in a Functional Language Succinctly


