Meteor is an open-source JavaScript web framework built using Node.js. As it uses JavaScript in both client and server, it allows you to build real-time applications faster. In addition, Meteor provides various built-in templates to use in your application. Building cross-platform application is the main advantage of the Meteor framework.
Integrating the Syncfusion Essential JS2 React components into Meteor will greatly reduce your development time and provide a rich look for your application. In this blog, I’ll walk you through the step-by-step procedures for configuring Syncfusion React components into Meteor framework.
Prerequisites
To create and run a Meteor app, you need to install Chocolatey and Meteor. Follow these steps:
- Run the command prompt with administrator privilege
- Copy the following command and run it in the command prompt. This will install Chocolatey
| @”%SystemRoot%\System32\WindowsPowerShell\v1.0\powershell.exe” -NoProfile -InputFormat None -ExecutionPolicy Bypass -Command “iex ((New-Object System.Net.WebClient).DownloadString(‘https://chocolatey.org/install.ps1’))” && SET “PATH=%PATH%;%ALLUSERSPROFILE%\chocolatey\bin” |
- Now run the following command to install Meteor
| choco install meteor |
Creating an app in Meteor
Navigate to the project folder in the command prompt and run the following command.
| meteor create app |
Thus, the default Meteor app with the required HTML, JavaScript, and CSS files will be created. Every new Meteor app includes the Blaze template by default.
Adding React to the Meteor app
As we are going to configure EJ2 React components, we need to add React in Meteor. For this, run the following command in the command prompt.
| meteor npm install –save react react-dom |
If you wish to remove the default Blaze template and use only React in your project, run the following command. In this blog, we didn’t remove the default template.
| meteor remove blaze-html-templates meteor add static-html |
Configuring EJ2 components
You can configure any Syncfusion React component into Meteor. We are going to configure the Data Grid, Charts, and Dropdown List EJ2 React components in this app.
Applying styles for components
Syncfusion EJ2 React components have built-in support for Material, Fabric, Bootstrap, and high contrast themes. Refer our theming documentation to learn more about adding themes for EJ2 React components.
Add Material theme for the components using CSS by referencing the required CDN link in the main.html page.
<head>

<link rel="stylesheet" href="https://cdn.syncfusion.com/ej2/material.css" />

</head>
Adding EJ2 Data Grid
Add EJ2 Data Grid to the app by following these steps:
- Add the div element required to render the grid in the main.html page. In addition, clear the unnecessary HTML elements created by the default template in the main.html page.
<body>

<div id='grid'></div>

</body>
- Install the grid package using the following command. This will install the React base package and necessary source dependent packages required to render the Data Grid component.
| meteor npm install @syncfusion/ej2-react-grids –save |
- To use React in the app, import the following classes in the js file.
import React from '@syncfusion/ej2-react-base/node_modules/react';
import { render } from '@syncfusion/ej2-react-base/node_modules/react-dom';- Import the GridComponent and other required classes in the main.js file.
import { GridComponent, Inject, Page, ColumnsDirective, ColumnDirective} from '@syncfusion/ej2-react-grids';
- Specify the data source and other required properties for the grid.
data = [

{

   OrderID: 10248, CustomerID: 'VINET', EmployeeID: 5, OrderDate: new Date(8364186e5), ShipName: 'Vins et alcools Chevalier', ShipCity: 'Reims', ShipAddress: '59 rue de l Abbaye', ShipRegion: 'CJ', ShipPostalCode: '51100', ShipCountry: 'France', Freight: 32.38, Verified: !0

},

//...

];


Meteor.startup(() => {

  render(<GridComponent ref={g => this.grid = g}  width="600" height="450"

    dataSource={data} allowPaging={true}>

    <ColumnsDirective>

    <ColumnDirective field='OrderID' width='100' textAlign="Right"/>

    <ColumnDirective field='CustomerID' width='100'/>

    <ColumnDirective field='EmployeeID' width='100' textAlign="Right"/>

    <ColumnDirective field='Freight' width='100' format="C2" textAlign="Right"/>

    <ColumnDirective field='ShipCountry' width='100'/>

    </ColumnsDirective>

    <Inject services={[Page]} />

    </GridComponent>, document.getElementById('grid')

  );

});
Adding EJ2 Chart
The EJ2 Charts control can be added to the app by following these steps:
- Add the div element required to render the chart in the main.html page.
<body>

<div id='chart'></div>

</body>
- After that, install the chart package using the following command
| meteor npm install @syncfusion/ej2-react-charts –save |
- Import the ChartComponent and other required classes in the main.js file.
import { ChartComponent, SeriesCollectionDirective, AxesDirective, AxisDirective, SeriesDirective, ColumnSeries, Legend, Category, Tooltip, DataLabel, Zoom, Crosshair, LineSeries, Selection } from'@syncfusion/ej2-react-charts';
- Specify the data source and other required properties for the charts.
data = [

{

  OrderID: 10248, CustomerID: 'VINET', EmployeeID: 5, OrderDate: new Date(8364186e5), ShipName: 'Vins et alcools Chevalier', ShipCity: 'Reims', ShipAddress: '59 rue de l Abbaye', ShipRegion: 'CJ', ShipPostalCode: '51100', ShipCountry: 'France', Freight: 32.38, Verified: !0

},

//...

];


Meteor.startup(() => {

  render(<ChartComponent ref={g => this.chart = g} id='charts' title='Sales

  Analysis' primaryXAxis={ { valueType: 'Category'} } width='550' height='450'

  legendSettings={ { visible: true} } primaryYAxis={ { labelFormat: '${value}K'}

  } tooltip={ { enable: true, shared: false } }>

    <Inject services={[ColumnSeries, Legend, Tooltip, DataLabel, LineSeries,

    Category]}/>

    <SeriesCollectionDirective>

    <SeriesDirective dataSource ={data}  xName='CustomerID' yName='Freight'

    type='Column' marker={ {dataLabel: { visible: true } } } name='Sales'>

    </SeriesDirective>

    </SeriesCollectionDirective>

    </ChartComponent>, document.getElementById('chart')

  );

});
Adding EJ2 Dropdown list
- Add the div element and CSS required to render the Dropdown List component in the main.html page.
<body>

<div id='dropdown'></div>

</body>
- Install the dropdown list package using the following command.
| meteor npm install @syncfusion/ej2-react-dropdowns –save |
- After that, import the DropDownListComponent class in the main.js file.
import { DropDownListComponent } from '@syncfusion/ej2-react-dropdowns';
- Specify the data source and other required properties for the Dropdown List component.
dataSource = [

  "France", "Germany", "Brazil", "Belgium", "Switzerland", "Venezuela", "Austria", "Mexico", "USA"

];


Meteor.startup(() => {

render(

  <DropDownListComponent id="ddlelement" dataSource={dataSource}

  change={this.onchanged} width ="300" popupHeight="200px" popupWidth="250px"

  placeholder="select a country" />, document.getElementById('dropdown')

);

});
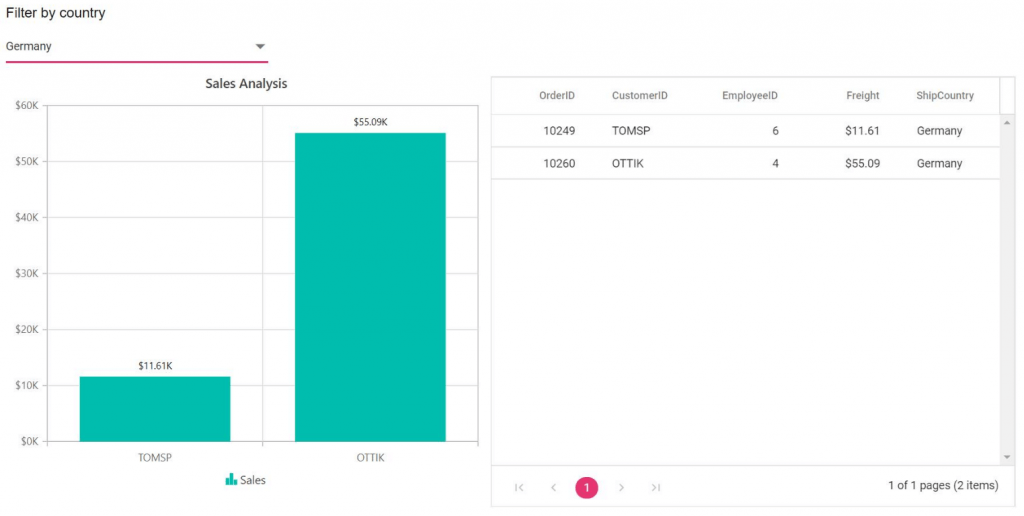
Filtering data
In this example, we have filtered the data of a chart and data grid using the ShipCountry field while selecting options in a drop-down list. For this, we have subscribed to the change event of the drop-down list. After generating the new data, we assigned it and refreshed the Data Grid and Charts controls.
onchanged = function(args){

  var newData = [];

  for(var i=0; i<data.length; i++){

  if(args.itemData.value == data[i]["ShipCountry"])

    newData.push(data[i]);

  }

  grid.dataSource = newData;

  grid.refresh();

  chart.series[0].dataSource = newData;

  chart.refresh();

}
Running the app
The created app can be run using the following command.
| Meteor |
The app will be running at the address by default. However, the running port can be changed by following this command.
| meteor run –port [PORT] |
This is the output of the sample.
You can get the complete sample from this GitHub location. We hope you are now comfortable with configuring the Syncfusion React components into Meteor framework. If you have any questions or need any clarification, please let us know in the comments section. You can also contact us through our support forum or Direct-Trac. We are always happy to assist you!
If you liked this post, we think you’ll also enjoy the following:


