
When a user interface enterprise application receives input, a common requirement will be to validate the provided information (such as email address, password, and phone number). This is to ensure that, it satisfies the desired format and range for further processing. You can validate data in a user interface control by using built-in validations such as INotifyDataErrorInfo and data annotation while following the MVVM pattern.
In this blog, I will provide a walk-through on how to implement Xamarin Forms validation over data in the Syncfusion Xamarin.Forms DataForm control. Please go through the DataForm getting started documentation before proceeding with this blog if you are new to the DataForm control.
A data form validates data and displays an error message in case of failure. This error message is shown at the bottom of the editor.
Built-in validations
We can validate fields in MVVM in the DataForm control using:
- INotifyDataErrorInfo
- Data annotation
INotifyDataErrorInfo
You can validate data by implementing the INotifyDataErrorInfo interface in the data object class. The below code example illustrates the same.
public class EmployeeInfo: INotifyDataErrorInfo, INotifyPropertyChanged
{
    private int _EmployeeID;
    private string _Name;
    private string _Title;

    public event PropertyChangedEventHandler PropertyChanged;
    public event EventHandler ErrorsChanged;

    public EmployeeInfo()
    {

    }
    public int EmployeeID
    {
        get { return this._EmployeeID; }
        set
        {
            this._EmployeeID = value;
            this.RaisePropertyChanged("EmployeeID");
        }
    }
    public string Name
    {
        get { return this._Name; }
        set
        {
            this._Name = value;
            this.RaisePropertyChanged("Name");
        }
    }
    public string Title
    {
        get { return this._Title; }
        set
        {
            this._Title = value;
            this.RaisePropertyChanged("Title");
        }
    }

    [Display(AutoGenerateField = false)]
    public bool HasErrors
    {
        get
        {
            return false;
        }
    }
    private void RaisePropertyChanged(string propertyName)
    {
        if (PropertyChanged != null)
            PropertyChanged(this, new PropertyChangedEventArgs(propertyName));
    }
    public IEnumerable GetErrors(string propertyName)
    {
        var list = new List();
        if (!propertyName.Equals("Title"))
            return list;

        if (this.Title.Contains("Marketing"))
            list.Add("Marketing is not allowed");
        return list;
    }
}
Data annotations
The validation of the data fields using data annotation attributes is explained in the below topics.
Number validation
You can validate numeric types like int, double, and decimal properties using the Range attribute in numeric and numeric up-down editors.
private int employeeID;
[Range(1000, 1500, ErrorMessage = "EmployeeID should be between 1000 and 1500")]
public int EmployeeID
{
    get { return this.employeeID; }
    set
    {
        this.employeeID = value;
        this.RaisePropertyChanged("EmployeeID");
    }
}
Phone number validation
You can validate the length of a phone number using the StringLength attribute.
[StringLength(10, ErrorMessage = "Phone number should have 10 digits.")]
public string ContactNumber
{
    get { return this.contactNumber; }
    set
    {
        this.contactNumber = value;
        this.RaisePropertyChanged("ContactNumber");
        this.GetErrors("ContactNumber");
    }
}
As phone number format varies based on country, you can also use a regular expression and INotifyDataErrorInfo for validating it.
Mandatory fields validation
If any field in your application is mandatory, use the Required attribute to validate the data.
private string name;

[Required(AllowEmptyStrings = false, ErrorMessage = "Name should not be empty")]
public string Name
{
    get { return this.name; }
    set
    {
        this.name = value;
        this.RaisePropertyChanged("Name");
    }
}
Email validation
You can validate an email ID using the EmailAddress attribute.
private string email;

[EmailAddress(ErrorMessage = "Please enter a valid e-mail id.")]
public string Email
{
    get { return this.email; }
    set
    {
        this.email = value;
        this.RaisePropertyChanged("Email");
        this.GetErrors("Email");
    }
}
Password validation
To validate a new password entered in a form, you can use a regular expression and INotifyDataErrorInfo.
private Regex passwordRegExp = new Regex("((?=.*\\d)(?=.*[a-z])(?=.*[A-Z])(?=.*[@#$%]).{6,20})");

private string password;
[DataType(DataType.Password)]
public string Password
{
    get { return this.password; }
    set
    {
        this.password = value;
        this.RaisePropertyChanged("Password");
    }
}

public IEnumerable GetErrors(string propertyName)
{
    var list = new List();
    if (!propertyName.Equals("Password"))
        return list;

    if (!this.passwordRegExp.IsMatch(this.Password))
    {
        list.Add("Password must contain at least one digit, one uppercase character and one special symbol");
    }
    return list;
}
String length validation
You can validate the length of any property value in the text editor using the StringLength attribute.
private string name;

[Required(AllowEmptyStrings = false, ErrorMessage = "Name should not be empty")]
[StringLength(10, ErrorMessage = "Name should not exceed 10 characters")]
public string Name
{
    get { return this.name; }
    set
    {
        this.name = value;
        this.RaisePropertyChanged("Name");
    }
}
You can also specify, the minimum and maximum character length for the string property.
private string title;
[MinLength(5, ErrorMessage = "Title should be at least 5 characters.")]
[MaxLength(15, ErrorMessage = "Title should not exceed 15 characters.")]
public string Title
{
    get { return this.title; }
    set
    {
        this.title = value;
        this.RaisePropertyChanged("Title");
    }
}
Date range validation
To check a date range in the date editor, you need to specify the minimum and maximum date range by using the DateRange attribute.
private DateTime joinedDate;
[DateRange(MinYear = 2010, MaxYear = 2017, ErrorMessage = "Joined date is invalid")]
public DateTime JoinedDate
{
    get
    {
        return joinedDate;
    }
    set
    {
        joinedDate = value;
    }
}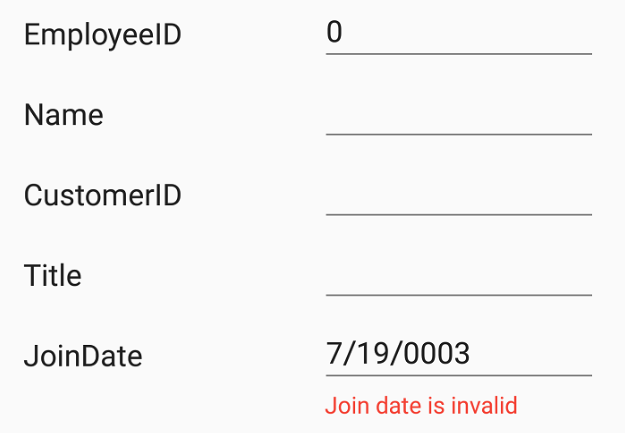
Date Range Xamarin Forms Validation
The following attributes are also available in data forms to validate fields.
Validation mode
The ValidationMode determines when the value should be validated. The supported validation modes are:
- LostFocus—Value validation occurs when the editor is out of focus.
- PropertyChanged—Value validation occurs immediately whenever it is changed.
- Explicit—Value is validated manually by calling the Validate or SfDataForm.Validate (propertyName) methods.
Explicit mode
The Explicit mode of validation refers to performing validation process irrespective of the state of the element, ie., it is performed at any time, as per the requirement. You can validate the values of all properties in a data object by using the following code.
bool isValid = dataForm.Validate();
To validate the value of a specific property, pass the property name as argument.
bool isPropertyValid = dataForm.Validate("PropertyName");Custom validation through events
You can also validate the data entered in the form using the Validating event of DataForm.
dataForm.Validating += DataForm_Validating;
private void DataForm_Validating(object sender, ValidatingEventArgs e)
{
    if (e.PropertyName == "Name")
    {
        if (e.Value != null && e.Value.ToString().Length > 8)
        {
            e.IsValid = false;
            e.ErrorMessage = "Name should not exceed 8 characters";
        }
    }
}
You can validate the data using fluent validation with this event.
You can receive a notification after completing a validation using the Validated event of the data form.
dataForm.Validated += DataForm_Validated;
private void DataForm_Validated(object sender, ValidatedEventArgs e)
{
    var isValid = e.IsValid;
    var propertyName = e.PropertyName;
}
Valid or positive message
If the value meets the desired criteria, you can show a valid or positive message. Like an error message, the valid message will also be displayed at the bottom of the editor.
private string name;
[DisplayOptions(ValidMessage = "Name length is enough")]
[StringLength(10, ErrorMessage = "Name should not exceed 10 characters")]
public string Name
{
    get { return this.name; }
    set
    {
        this.name = value;
        this.RaisePropertyChanged("Name");
    }
}
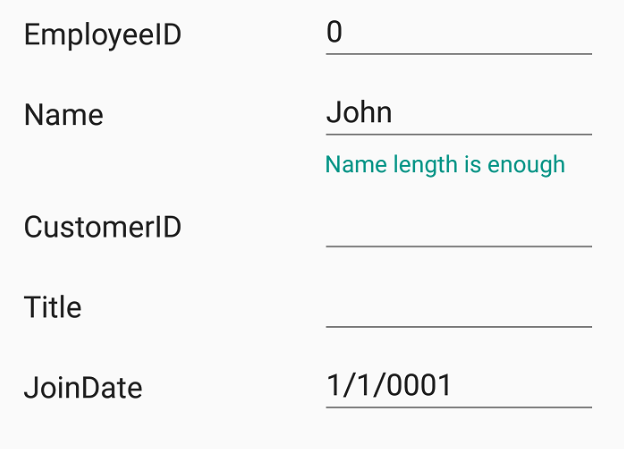
Valid message – Xamarin Forms Validation
You can validate the values of all editors, such as entry, numeric, check box, picker, date, or time.
Validation label customization
You can customize the default view of the validation label by using the ValidationTemplate property of the DataForm control. It lets you choose a different data template for each validation message, customizing the appearance of a validation message based on certain conditions.
<ContentPage.Resources>
    <ResourceDictionary>
        <local:TemplateSelector x:Key="validationDataTemplateSelector" />
    </ResourceDictionary>
</ContentPage.Resources>

<dataForm:SfDataForm Grid.Row="1" x:Name="dataForm" ValidationTemplate="{StaticResource validationDataTemplateSelector}" />
Creating different templates for validation messages
The following code shows different templates for each field.
<Grid xmlns="http://xamarin.com/schemas/2014/forms"
             xmlns:x="http://schemas.microsoft.com/winfx/2009/xaml"
             x:Class="DataForm_Validation.ValidMessageTemplate"
    VerticalOptions="FillAndExpand" HorizontalOptions="FillAndExpand">
    <Grid BackgroundColor="Transparent">
        <Button x:Name="maingrid"  CornerRadius="8"  Text="Name length is enough" FontSize="9" TextColor="Green" VerticalOptions="FillAndExpand" HorizontalOptions="FillAndExpand"/>
   </Grid>
</Grid>
<Grid xmlns="http://xamarin.com/schemas/2014/forms"
xmlns:x="http://schemas.microsoft.com/winfx/2009/xaml"
x:Class="DataForm_Validation.InValidMessageTemplate"
VerticalOptions="FillAndExpand" HorizontalOptions="FillAndExpand">
<Grid BackgroundColor="Transparent">
<Button x:Name="maingrid" CornerRadius="8" Text="Please enter your first name" FontSize="9" TextColor="White" VerticalOptions="FillAndExpand" HorizontalOptions="FillAndExpand"/>
</Grid>
</Grid>Choose different templates based on conditions
In the DataTemplateSelector, you can return the desired template conditionally based on the DataFormItem.
public class TemplateSelector : DataTemplateSelector
{
    public DataTemplate ValidMessageTemplate { get; set; }
    public DataTemplate InvalidMessageTemplate { get; set; }
    public DataTemplate LastNameTemplate { get; set; }
    public DataTemplate EmailTemplate { get; set; }
    public DataTemplate ContactNumberTemplate { get; set; }

    public TemplateSelector()
    {
        ValidMessageTemplate = new DataTemplate(typeof(ValidMessageTemplate));
        InvalidMessageTemplate = new DataTemplate(typeof(InValidMessageTemplate));
        EmailTemplate = new DataTemplate(typeof(EmailTemplate));
        ContactNumberTemplate = new DataTemplate(typeof(ContactNumberTemplate));
    }

    protected override DataTemplate OnSelectTemplate(object item, BindableObject container)
    {
        var dataform = (container as SfDataForm);
        if (dataform == null) return null;
        if (dataform != null)
        {
            if ((item as DataFormItem).LabelText == "First Name")
            {
                if (!(item as DataFormItem).IsValid)
                {
                    return InvalidMessageTemplate;
                }
                else
                {
                    return ValidMessageTemplate;
                }
            }
            else if ((item as DataFormItem).LabelText == "Email")
            {
                if (!(item as DataFormItem).IsValid)
                {
                    return EmailTemplate;
                }
            }
            else if ((item as DataFormItem).LabelText == "Contact Number")
            {
                if (!(item as DataFormItem).IsValid)
                {
                    return ContactNumberTemplate;
                }
            }
            return null;
        }
        else
            return null;

    }
}
The following screenshot shows the validation message customization done using the above code.
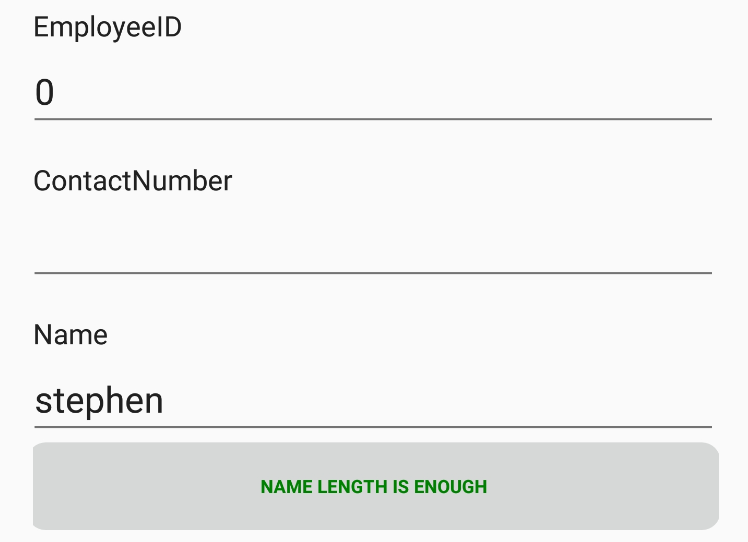
Customized valid template
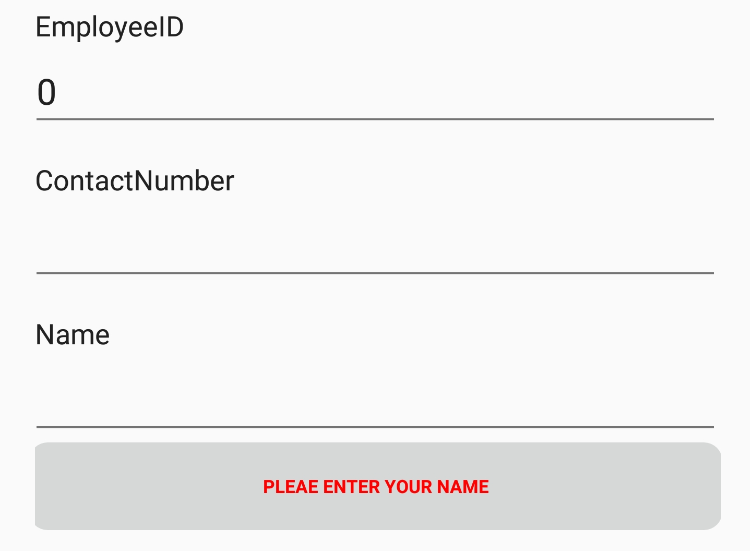
Customized invalid template
Conclusion
In this blog post, we saw how to validate data in the Syncfusion DataForm control. The sample for this is available in this GitHub location. Please feel free to try out this sample and provide your feedback or questions in the comments section. You can explore other features of the DataForm control in our documentation.
If you have any questions or require clarification about these features, please let us know in the comments below. You can also contact us through our support forum, Direct-Trac, or Feedback Portal. We are happy to assist you!


Comments (3)
[…] How to Implement Xamarin Forms Validation (Nijamudeen) […]
… [Trackback]
[…] Find More Informations here: blog.syncfusion.com/post/how-to-implement-xamarin-forms-validation.aspx […]
… [Trackback]
[…] Read More here: syncfusion.com/blogs/post/how-to-implement-xamarin-forms-validation.aspx […]
Comments are closed.