
Having space in the office to hold meetings plays a major role in today’s business world. Aside from having it, you’ll need to share it efficiently among teams without conflict, which can be a bit challenging.
To support an easy booking of rooms among various teams with no time conflicts, the meeting room calendar allows everyone in your workspace to check for the availability of rooms and have control over them in seconds. Let’s walk through how to customize the look and feel of our JavaScript scheduler component to design a meeting room calendar.
Multiple resources—overview
As a continuation to my previous blog, which had a basic overview of the JavaScript scheduler and its usage in a real-time scenario, I’ll continue here with an overview of the multiple resources concept and how to utilize this feature in designing the meeting room calendar.
The feature name itself portrays that the scheduler allots unique individual space for more than one resource on the same calendar. The resource names are grouped in a hierarchical structure in the scheduler’s header part and their equivalent workspace parts are displayed separately at the bottom to hold their respective appointments.
The important options available with the multiple resources concept are:
- Group by date—Given resources are grouped under each date.
- Group by child—All the child-level resources are grouped under their parent resource names.
- Grouped or linked events—A single appointment is shared by more than one resource.
- Customizable work days for each resource—Different work days can be assigned for each resource.
Now, let’s dive in depth and see how to design a meeting room calendar.
Designing a meeting room calendar
I’m going to display only the day view for this example while designing our meeting room calendar. As you get started, there should be some restrictions already set for booking meeting rooms, like being unable to reserve a room if it is already booked, and being unable to book during a non-accessible time range, such as lunch or during maintenance works.
Also, past meeting events won’t be editable. For this example, I’m considering July 31, 2018, to be the current date of scheduler and, therefore, trying to book rooms on dates before this can’t be done. The same is applicable to editing actions, too.
Getting started
As my previous blog already explained the detailed steps of how to get started with the scheduler control in TypeScript, I’m moving past those basics here.
First, create a new Essential JS 2 application in TypeScript with the help of the QuickStart project and do the necessary configurations.
Once the configuration works are done, add the scheduler control in your application and inject only the Day view module.
Populating resources data
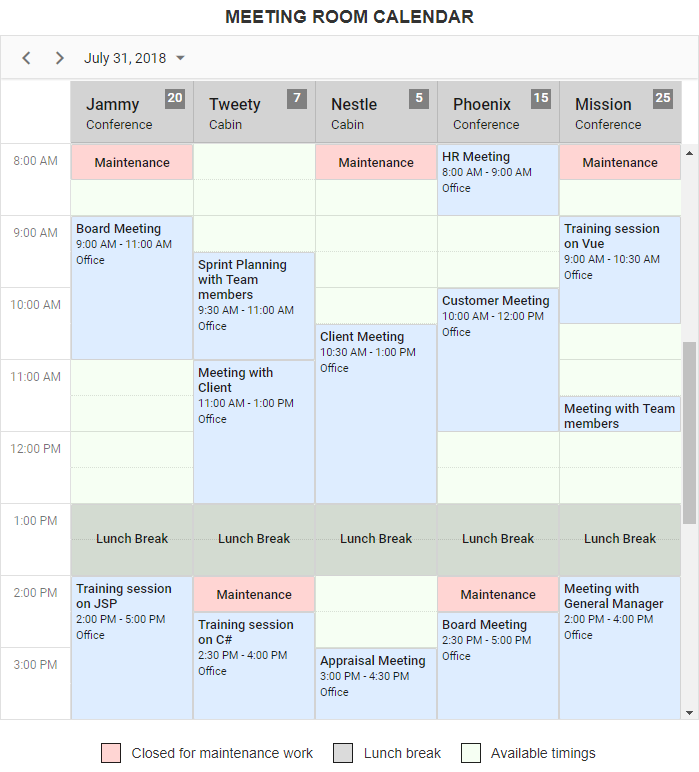
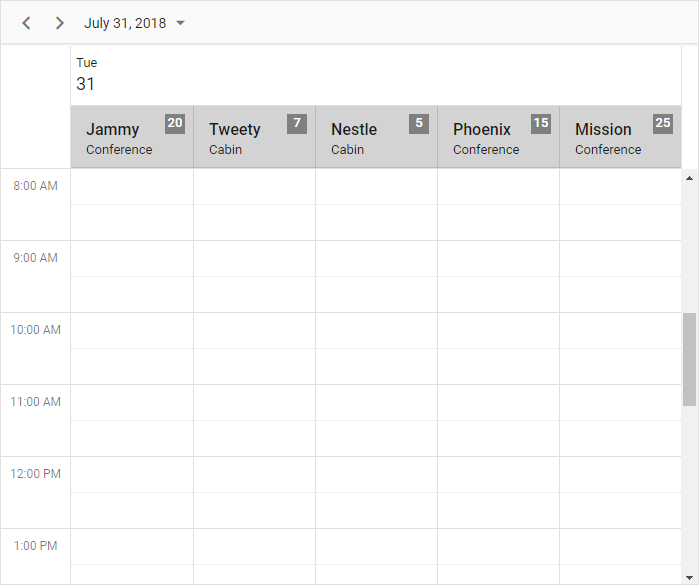
Let’s see how to customize the scheduler layout to display the meeting rooms. Here, the meeting rooms are defined as resources and each room will be displayed parallel against the common timescale.
Imagine that an office has five meeting rooms within its premises, and everyone should share those rooms. As soon as a person books a room, they own it for the entire booked time range and no other person can reserve the same room during that specific time.
To start with, let’s assume that the resource data holds common room information such as room name, room ID, and a specific color to denote resource appointments. Apart from the default resource fields, you can also define other custom resource fields such as room capacity and its type using the resources property.
    resources: [{
        field: 'RoomId', title: 'Select Room', name: 'Rooms', allowMultiple: true,
        dataSource: [
            { text: 'Jammy', id: 1, capacity: 20, type: 'Conference' },
            { text: 'Tweety', id: 2, capacity: 7, type: 'Cabin'},
            { text: 'Nestle', id: 3, capacity: 5, type: 'Cabin' },
            { text: 'Phoenix', id: 4, capacity: 15, type: 'Conference' },
            { text: 'Mission', id: 5, capacity: 25, type: 'Conference' }
        ],
        textField: 'text', idField: 'id'
    }]
I have simply defined the resources collection and displayed it visually on the scheduler. Now, we need to define those resource collection names to group them under the group property.
    group: {
        resources: ['Rooms']
    }
NOTE: While defining resource names under the group property, make sure that you are using the text value assigned for the name field of the resources collection.
Customizing the resource layout
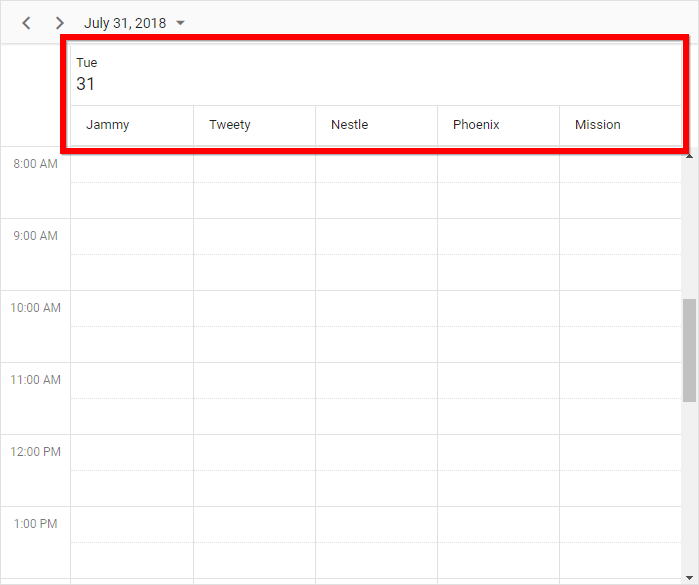
The resources are displayed on the scheduler layout now and it is time to customize the look of the resource header rows and columns.
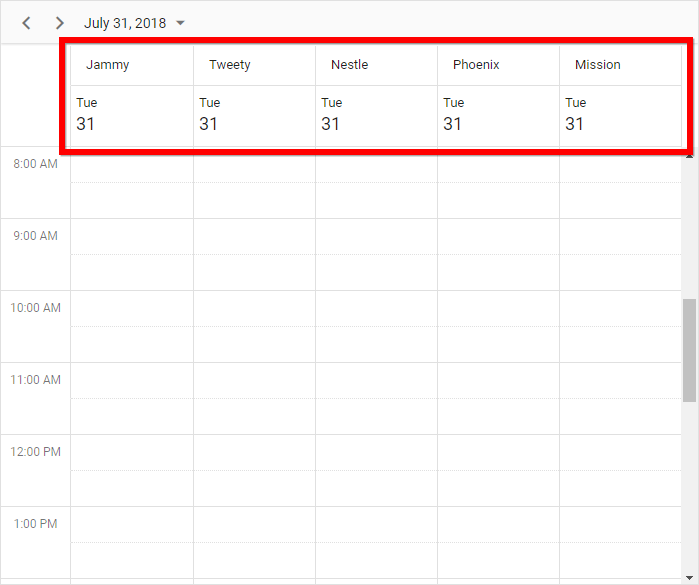
As we are displaying scheduler in day view alone, it is not necessary to repeat the date header under each resource as shown in the previous image. It is enough to display a single common date header. To do this, set the byDate property to true.
    group: {
        resources: ['Rooms'],
        byDate: true
    }
Also, customize the resource header row through its template property and change its look as shown in the following using the resourceHeaderTemplate property.
<script id="resourceTemplate" type="text/x-template">
    <div class='template-wrap'>
        <div class="resource-details">
            <div class="room-name">${getRoomName(data)}</div>
            <div class="room-type">${getRoomType(data)}</div>
        </div>
        <div class="room-capacity">${getRoomCapacity(data)} Seats</div>
    </div>
</script>
    let scheduleOptions: ScheduleModel = {
        width: '100%',
        height: '850px',
        currentView: "Day",
        selectedDate: new Date(2018, 6, 31),
        resourceHeaderTemplate: '#resourceTemplate',
        …
        …
The CSS styles to be applied to achieve the above look are as follows. Also, I’m going to hide the date header row here as we are displaying the same date for all resources, which is already available on the top-most common date header range.
<style>

    .e-schedule .e-vertical-view.e-by-date .e-date-header-wrap table tbody tr:nth-child(1) .e-header-cells,
    .e-schedule .e-vertical-view.e-by-date .e-left-indent-wrap table tbody tr:nth-child(1) .e-header-cells,
    .e-schedule .e-schedule-toolbar .e-toolbar-items .e-toolbar-right .e-today {
        display: none;
    }

    .e-schedule .e-vertical-view .e-resource-cells {
        height: 62px;
        background-color: lightgrey !important;
    }

    .e-schedule .e-left-indent-wrap th.e-resource-cells{
        background-color: #fff !important;
    }

    .e-schedule .template-wrap .room-capacity {
        text-align: center;
        float: right;
        height: 20px;
        width: 60px;
        background: gray;
        font-weight: 500;
        color: white;
    }

    .e-schedule .template-wrap .resource-details {
        float: left;
    }

    .e-schedule .template-wrap .resource-details .room-name {
        font-size: 16px;
        font-weight: 500;
        margin-top: 5px;
    }

</style>
Cell customization
Now, let’s customize the cell color to add special meaning to it, where the green colored slots show the room’s availability. You can achieve this customization with the help of CSS.
<style>

  .e-schedule .e-vertical-view .e-work-cells, .available {
     background-color: #f6fff3;
  }

</style>
Populating the meeting data
The layout customization is over now, and it’s time to fill the scheduler with room reservation data. Let’s form the data with meeting-related fields such as meeting summary, start time, and end time, along with the location. Then, assign it to the scheduler dataSource property. Each appointment in the scheduler notes a confirmed booking to convey the room reservation status at a specific time.
NOTE: Make sure that the correct field names are mapped into the eventSettings default scheduler fields from dataSource.
    eventSettings: {
        dataSource: [
           { Id: 1, Subject: "Board Meeting", Location: "Office", Description: "Meeting to discuss business goal of 2018.", StartTime: new Date(2018, 6, 30, 9, 0), EndTime: new Date(2018, 6, 30, 11, 0), RoomId: 1 },
           { Id: 2, Subject: "Training session on JSP", Location: "Office", Description: "Knowledge sharing on JSP topics.", StartTime: new Date(2018, 6, 30, 14, 0), EndTime: new Date(2018, 6, 30, 17, 0), RoomId: 1 },
           …
           …
        ],
        fields: {
            id: 'Id',
            subject: { title: 'Summary', name: 'Subject' },
            location: { title: 'Location', name: 'Location' },
            description: { title: 'Comments', name: 'Description' },
            startTime: { title: 'From', name: 'StartTime' },
            endTime: { title: 'To', name: 'EndTime' }
        }
    }
Differentiating past bookings
Let’s differentiate the reservations that are finished and in a disabled state by making use of the eventRendered event.
    // Check whether the bookings belong to the past dates
    let isReadOnly: Function = (endDate: Date): boolean => {
        return (endDate < new Date(2018, 6, 31, 0, 0));
    };

    eventRendered: (args: EventRenderedArgs) => {
        let data: any = <any>args.data;
        if (isReadOnly(data.EndTime)) {
            args.element.setAttribute('aria-readonly', 'true');
            args.element.classList.add('e-read-only');
        }
    }
The style for differentiating the older reservations is as follows.
<style>

    .e-schedule .e-read-only {
        opacity: .8;
    }

</style>
Adding recurring blocked appointments
A specific time on scheduler can be blocked by adding customized appointments with custom fields such as EventType and differentiating them with a light grey color denoting a lunch break and a light red shade depicting the maintenance status for room cleaning purposes. Also, the time range can be made read-only and distinguished through CSS customizations by adding appropriate class names to those appointment elements with the help of an eventRendered event.
    eventRendered: (args: EventRenderedArgs) => {
        let data: any = <any>args.data;
        if (isReadOnly(data.EndTime) || data.EventType == "Lunch" || data.EventType == "Maintenance") {
            args.element.setAttribute('aria-readonly', 'true');
            args.element.classList.add('e-read-only');
        }
        if(data.EventType == "Lunch"){
            args.element.classList.add('e-lunch-break');
        }
        else if(data.EventType == "Maintenance"){
            args.element.classList.add('e-maintenance');
        }
    }
NOTE: Such kinds of special, customized appointments are grouped for multiple resources by setting allowGroupEdit to true within the group property.
    group: {
        resources: ['Rooms'],
        byDate: true,
        allowGroupEdit: true
    }
The CSS to be applied on those blocked appointments is as follows.
<style>

    .e-schedule .e-maintenance .e-time, .e-schedule .e-lunch-break .e-time,
    .e-schedule .e-maintenance .e-recurrence-icon, .e-schedule .e-lunch-break .e-recurrence-icon {
        display: none !important;
    }

    .e-schedule .e-maintenance .e-appointment-details, .e-schedule .e-lunch-break .e-appointment-details{
        text-align: center !important;
        padding-top: 6px !important;
    }

    .e-schedule .e-lunch-break .e-appointment-details {
        padding-top: 22px !important;
    }

    .e-schedule .e-lunch-break {
        background-color: rgb(0,0,0,0.14) !important;
        opacity: 1 !important;
    }

    .e-schedule .e-maintenance {
        background-color: #ffd5d3 !important;
        opacity: 1 !important;
    }

</style>
Blocking reservations on inaccessible cells
The cell and appointment customization are completely finished. Now we need to concentrate on another important action: making certain cells inaccessible to users, such as the cells of past dates. This can be done by adding restrictions within the renderCell and popupOpen events.
To check for the past date cells and differentiate them, add conditions within the renderCell event.
    renderCell: (args: RenderCellEventArgs) => {
        if (args.element.classList.contains('e-work-cells')) {
            // To disable the past date cells
            if(args.date < new Date(2018, 6, 31, 0, 0)) {
                args.element.setAttribute('aria-readonly', 'true');
                args.element.classList.add('e-read-only-cells');
            }
        }
    }
To prevent the pop-up from opening on inaccessible slots, add the conditions within popupOpen event as follows.
    popupOpen: (args: PopupOpenEventArgs) => {
        let data: any = <any>args.data;
        if(args.type === "QuickInfo" || args.type === "Editor" || args.type === "RecurrenceAlert" || args.type === "DeleteAlert"){
            let target: HTMLElement = (args.type == "RecurrenceAlert" || args.type == "DeleteAlert") ? data.element[0] : args.target;
            if(target.classList.contains('e-work-cells')){
                if ((target.classList.contains('e-read-only-cells'))) {
                    args.cancel = true;
                }
            }
        }
    }
Blocking the existing booked time slots
As I stated earlier, only one meeting can be held at a time in each room and, therefore, it is better to change the appointment appearance, to extend its width to the full size of the cell, thus not allowing users to click on the cells behind it.
The styles to change the appointment appearance are as follows.
<style>

    .e-schedule .e-vertical-view .e-day-wrapper .e-appointment .e-subject{
        font-weight: 500;
    }

    .e-schedule .e-vertical-view .e-day-wrapper .e-appointment {
        width: 100% !important;
        background: #deedff;
        color: rgba(0, 0, 0, 0.87);
        border: 1px solid lightgrey;
    }

</style>
Additionally, we may also need to extend the restrictions within the popupOpen event to block the pop-up from opening on past bookings, as well as on the cells which are already occupied.
    popupOpen: (args: PopupOpenEventArgs) => {
        let data: any = <any>args.data;
        if(args.type === "QuickInfo" || args.type === "Editor" || args.type === "RecurrenceAlert" || args.type === "DeleteAlert"){
            let target: HTMLElement = (args.type == "RecurrenceAlert" || args.type == "DeleteAlert") ? data.element[0] : args.target;
            if(!isNullOrUndefined(target) && target.classList.contains('e-work-cells')){
                let endDate = data.endTime as Date;
                let startDate = data.startTime as Date;
                let groupIndex = data.groupIndex as number;
                if ((target.classList.contains('e-read-only-cells')) || (!scheduleObj.isSlotAvailable(startDate as Date, endDate as Date, groupIndex as number))) {
                    args.cancel = true;
                }
            }
            else if(target.classList.contains('e-appointment') && (isReadOnly(data.EndTime) || target.classList.contains('e-lunch-break') || target.classList.contains('e-maintenance'))){
                args.cancel=true;
            }
        }
    }
To block new reservations that conflict with existing reserved slots, and to block the update action on existing reservations that extends to the nearby reserved slot, we need to check the condition within the actionBegin event and cancel it.
    actionBegin: (args: ActionEventArgs) => {
        if(args.requestType == "eventCreate" || args.requestType == "eventChange"){
            let data: any = <any>args.data;
            let groupIndex = scheduleObj.eventBase.getGroupIndexFromEvent(data);
            if(!scheduleObj.isSlotAvailable(data.StartTime as Date, data.EndTime as Date, groupIndex as number)) {
                args.cancel = true;
            }
        }
    }
Summary
To summarize, we have seen how to customize the scheduler with the multiple resources concept to design a meeting room calendar by using additional styling options. Keep checking up with us, as more useful blogs are waiting in our queue that show more of the customizing options available in the scheduler.
Try our scheduler component by downloading the free 30-day trial or checking it out on GitHub, and feel free to have a look at our online samples and documentation to explore other available options. If you have any questions or require clarification, please let us know in the comments section below. You can also contact us through our support forum or Direct-Trac. We are always happy to assist you!
You can download the complete sample from GitHub.
If you like this blog post, we think you’ll also like the following free e-books:
JavaScript Succinctly
TypeScript Succinctly
AngularJS Succinctly
Angular 2 Succinctly


