
Syncfusion Xamarin.Forms scheduler is used to schedule and manage appointments through an intuitive user interface, similar to the native device calendar. Its rich feature set includes custom appointments, appointment rescheduling, and functionalities like customization, navigation, and date restrictions.
This blog post explains the Syncfusion scheduler component in Xamarin.Forms, which enables you to develop a scheduling application. The following image represents the outcome of a schedule that has been built following the steps in this blog post.
Configuring scheduler
Creating a Xamarin.Forms project
- Create new Cross Platform App (Xamarin) project.
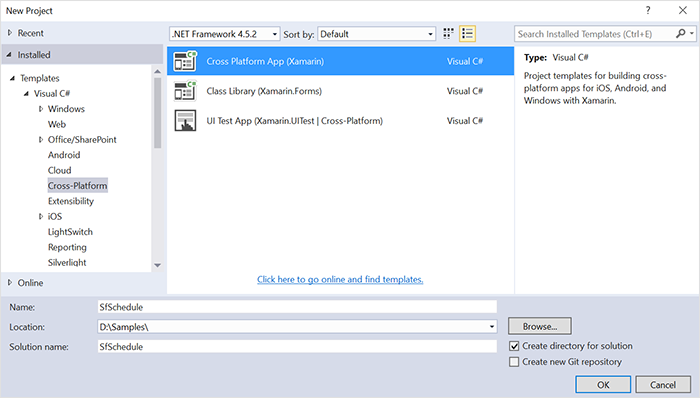
- In a new window, select Template->Blank App, UI Technology->Xamarin.Forms and Code Sharing Strategy ->Portable Class Library (PCL). Click OK.

Adding NuGet package
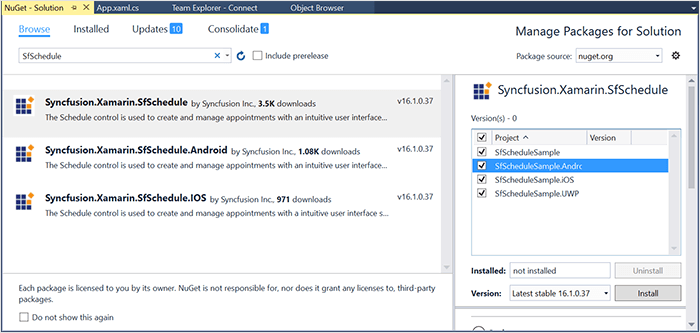
Open Solution Explorer ->Project Name. Right-click and select Manage NuGet Packages. In that window, search and install the following NuGet.
NuGet Package Name: Syncfusion.Xamarin.SfSchedule
Refer to the documentation to learn more about referencing the Syncfusion schedule in a Xamarin.Forms application and how to configure it.
Starting with v16.2.0.x, if you reference Syncfusion assemblies from a trial setup or from the NuGet feed, you must also include a license key in your projects. Please refer to this link to learn about registering a Syncfusion license key in your Xamarin application to use our components.
Creating schedule
To add the schedule control to an application, follow these steps:
1. Import the following schedule control namespace in the XAML page.
>:syncfusion="clr-namespace:Syncfusion.SfSchedule.XForms;assembly=Syncfusion.SfSchedule.XForms"
2. Add the schedule control either as content to the ContentPage or as a nested child.
<?xml version="1.0"
encoding="utf-8" ?>
<ContentPage
    x:Class="SfScheduleSample.MainPage"
    >="http://xamarin.com/schemas/2014/forms"
    >:x="http://schemas.microsoft.com/winfx/2009/xaml"
    >:local="clr-namespace:SfScheduleSample"
    >:syncfusion="clr-namespace:Syncfusion.SfSchedule.XForms;assembly=Syncfusion.SfSchedule.XForms">
    <ContentPage.Content>
        <syncfusion:SfSchedule x:Name="schedule"/>
    </ContentPage.Content>
</ContentPage>
Launching schedule on each platform
Android and UWP launch the schedule without any initialization. But an additional step is required for launching the schedule (or any custom component) in iOS.
iOS project
Call the SfScheduleRenderer.Init() method in the FinishedLaunching overridden method of the AppDelegate class after the Xamarin.Forms Framework initialization and before the LoadApplication is called, as shown in the following code example.
public override bool
FinishedLaunching(UIApplication app, NSDictionary options)
{
    global::Xamarin.Forms.Forms.Init();
    SfScheduleRenderer.Init();

    LoadApplication(new App());

    return base.FinishedLaunching(app, options);
}
Release mode issue in UWP
UWP applications launch the schedule without any initialization. However, there is a known framework issue in UWP. The custom controls will not render when the application is deployed in release mode.
This problem can be resolved by initializing the schedule assemblies in App.xaml.cs in UWP projects as in the following code snippet.
protected override void OnLaunched(LaunchActivatedEventArgs e)
{
        ....

        rootFrame.NavigationFailed += OnNavigationFailed;
        // you'll need to add `using System.Reflection;`
        List<Assembly> assembliesToInclude = new List<Assembly>();
        //Now, add all the assemblies your app uses
        assembliesToInclude.Add(typeof(SfScheduleRenderer).GetTypeInfo().Assembly);
        // replaces Xamarin.Forms.Forms.Init(e);

        Xamarin.Forms.Forms.Init(e, assembliesToInclude);

        ....
}
Different built-in views
Schedule displays appointments using four different built-in views:
- Day View—You can display a single day using day view. Appointments on a specific day will be arranged in respective timeslots based on their duration.
- Week View—You can view an entire week using week view. Appointments are arranged in timeslots based on their duration within their respective day of the week.
- Workweek View—You can display only working days of the week by using workweek view. By default, Saturday and Sunday are the nonworking days. You can customize it with any days of the week. Appointments are arranged in timeslots based on their duration within their respective day of the week.
- Month View—You can display an entire month of dates using month view. Appointments are displayed using indicators and viewed in inline by setting the ShowAppointmentsInline property of the schedule as true.
By default, Day View will be loaded and today’s date will be displayed in all views. You can display a view for a particulate date by setting the MoveToDate property.
<syncfusion:SfSchedule x:Name="schedule" ScheduleView="WeekView" />
Binding appointments
You can bind custom appointment data to a schedule. A custom appointment class must contain two DateTime fields and a string field.
In this case, a meeting class has been created that generates meeting details containing the meeting time, subject, and other related information. In a real-world scenario, you can also bind the data from the services and database to render the appointments.
Steps to bind custom appointments in schedule
- Create model for appointments.
- Create ViewModel.
- Create recurring appointments.
- Map and bind data source.
Creating model for appointments
public class Meeting : INotifyPropertyChanged
{
    #region private variables

    private string eventName;
    private string organizer;
    private DateTime beginTime;
    private DateTime endTime;
    private Color color;
    private bool isAllDay;
    private string recurrenceRule;

    #endregion

    #region Public Properties
    public string EventName
    {
        get
        {
            return this.eventName;
        }
        set
        {
            this.eventName = value;
            this.RaisePropertyChanged("EventName");
        }
    }
    public string Organizer
    {
        get
        {
            return this.organizer;
        }
        set
        {
            this.organizer = value;
            this.RaisePropertyChanged("Organizer");
        }
    }
    public DateTime BeginTime
    {
        get
        {
            return this.beginTime;
        }
        set
        {
            this.beginTime = value;
            this.RaisePropertyChanged("BeginTime");
        }
    }
    public DateTime EndTime
    {
        get
        {
            return this.endTime;
        }
        set
        {
            this.endTime = value;
            this.RaisePropertyChanged("EndTime");
        }
    }
    public Color Color
    {
        get
        {
            return this.color;
        }
        set
        {
            this.color = value;
            this.RaisePropertyChanged("Color");
        }
    }
    public bool IsAllDay
    {
        get
        {
            return this.isAllDay;
        }
        set
        {
            this.isAllDay = true;
            this.RaisePropertyChanged("IsAllDay");
        }
    }
    public string RecurrenceRule
    {
        get
        {
            return this.recurrenceRule;
        }
        set
        {
            this.recurrenceRule = value;
            this.RaisePropertyChanged("RecurrenceRule");
        }
    }

    #endregion

    #region INotifyPropertyChanged implementation

    public event PropertyChangedEventHandler PropertyChanged;
    private void RaisePropertyChanged(string propertyName)
    {
        if (this.PropertyChanged != null)
            this.PropertyChanged(this, new PropertyChangedEventArgs(propertyName));
    }
    #endregion
}
You need to inherit this class from INotifyPropertyChanged for dynamic changes in custom data.
Creating ViewModel
public class ViewModel
{
    public ObservableCollection<Meeting> Meetings { get; set; }
    List<string> eventNameCollection;
    List<Color> colorCollection;
    public ViewModel()
    {
        this.Meetings = new ObservableCollection<Meeting>();
        this.CreateEventNameCollection();
        this.CreateColorCollection();
        this.CreateAppointments();
    }

    /// <summary>
    /// Creates meetings and stores in a collection.
    /// </summary>
    private void CreateAppointments()
    {
        Random randomTime = new Random();
        List<Point> randomTimeCollection = GetTimeRanges();
        DateTime date;
        DateTime DateFrom = DateTime.Now.AddDays(-10);
        DateTime DateTo = DateTime.Now.AddDays(10);
        DateTime dataRangeStart = DateTime.Now.AddDays(-3);
        DateTime dataRangeEnd = DateTime.Now.AddDays(3);

        for (date = DateFrom; date < DateTo; date = date.AddDays(1))
        {
            if ((DateTime.Compare(date, dataRangeStart) > 0) && (DateTime.Compare(date, dataRangeEnd) < 0))
            {
                for (int appointmentIndex = 0; appointmentIndex < 3; appointmentIndex++)
                {

                    Meeting meeting = new Meeting();

                    int hour = (randomTime.Next((int)randomTimeCollection[appointmentIndex].X, (int)randomTimeCollection[appointmentIndex].Y));

                    meeting.BeginTime = new DateTime(date.Year, date.Month, date.Day, hour, 0, 0);

                    meeting.EndTime = (meeting.BeginTime.AddHours(1));

                    meeting.EventName = eventNameCollection[randomTime.Next(3)];

                    meeting.Color = colorCollection[randomTime.Next(3)];

                   if (appointmentIndex % 3 == 0)

                       meeting.IsAllDay = true;

                   Meetings.Add(meeting);
                }
            }
            else
            {
                Meeting meeting = new Meeting();

                meeting.BeginTime = new DateTime(date.Year, date.Month, date.Day, randomTime.Next(9, 11), 0, 0);
                meeting.EndTime = (meeting.BeginTime.AddHours(1));

                meeting.EventName = eventNameCollection[randomTime.Next(3)];

                meeting.Color = colorCollection[randomTime.Next(3)];

                Meetings.Add(meeting);
            }
        }
        this.Meetings[1].RecurrenceRule = "FREQ=DAILY;INTERVAL=1;COUNT=5";
    }

    /// <summary>
    /// Creates event names collection.
    /// </summary>
    private void CreateEventNameCollection()
    {

        eventNameCollection = new List<string>();

        eventNameCollection.Add("General Meeting");

        eventNameCollection.Add("Plan Execution");

        eventNameCollection.Add("Project Plan");
    }

    /// <summary>
    /// Creates color collection.
    /// </summary>
    private void CreateColorCollection()
    {

        colorCollection = new List<Color>();

        colorCollection.Add(Color.FromHex("#FF339933"));

        colorCollection.Add(Color.FromHex("#FF00ABA9"));

        colorCollection.Add(Color.FromHex("#FFE671B8"));
    }

    /// <summary>
    /// Gets the time ranges.
    /// </summary>
    private List<Point> GetTimeRanges()
    {
        List<Point> randomTimeCollection = new List<Point>();

        randomTimeCollection.Add(new Point(9, 11));
        randomTimeCollection.Add(new Point(12, 14));

        randomTimeCollection.Add(new Point(15, 17));
        return randomTimeCollection;
    }
}
In the previous code, all-day and recurring appointments are also added. By using RRule, recurring appointments are added.
The appointment collection can be any commonly preferred data source. Here, ObservableCollection is used, as it has implemented the INotifyCollectionChanged interface, and as we usually want the schedule to be updated for dynamic data.
Creating RRule using recurrence properties
You can also create RRule by using RecurrenceProperties as shown below.
var meeting = new Meeting();
meeting.BeginTime = new DateTime(date.Year, date.Month, date.Day, randomTime.Next(9, 11),
0, 0);
meeting.EndTime = (meeting.BeginTime.AddHours(1));
meeting.EventName =
eventNameCollection[randomTime.Next(4)];
meeting.Color = colorCollection[randomTime.Next(3)];

RecurrenceProperties
recurrenceProperties = new RecurrenceProperties();
recurrenceProperties.RecurrenceType = RecurrenceType.Daily;
recurrenceProperties.IsRangeRecurrenceCount = true;
recurrenceProperties.DailyNDays = 2;
recurrenceProperties.IsDailyEveryNDays = true;
recurrenceProperties.RangeRecurrenceCount = 10;
meeting.RecurrenceRule = DependencyService.Get<IRecurrenceBuilder>().RRuleGenerator(recurrenceProperties,
meeting.BeginTime, meeting.EndTime);
Refer here to learn more about recurring appointments.
Mapping and binding data sources
Map custom class properties with the schedule component using the ScheduleAppointmentMapping property.
Then, set the ViewModel to the BindingContext of your schedule to bind ViewModel properties to schedule and assign a created meeting collection as DataSource for the schedule.
<syncfusion:SfSchedule x:Name="schedule" DataSource="{Binding Meetings}">
            <syncfusion:SfSchedule.AppointmentMapping>
                <syncfusion:ScheduleAppointmentMapping
                    ColorMapping="Color"
                    EndTimeMapping="EndTime"
                    IsAllDayMapping="IsAllDay"
                    StartTimeMapping="BeginTime"
                    RecurrenceRuleMapping="RecurrenceRule"
                    SubjectMapping="EventName" />
            </syncfusion:SfSchedule.AppointmentMapping>
            <syncfusion:SfSchedule.BindingContext>
                <local:ViewModel />
            </syncfusion:SfSchedule.BindingContext>
</syncfusion:SfSchedule>
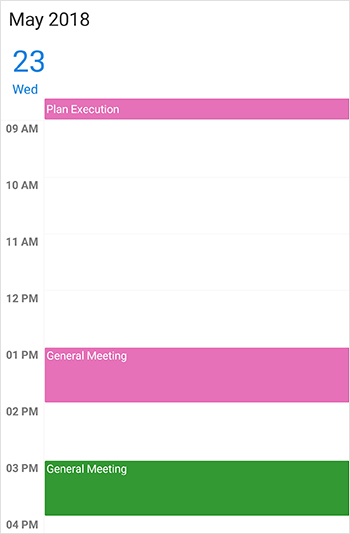
Now, a schedule is configured in your application. Just running the sample with the previous steps will render a schedule with appointments.

The above screenshot displays the result of the schedule without any additional settings. However, as an end user, you may want to customize the appointments, restricting dates and localizing text. Those customization options are described below.
Appointment customization through templates
The default appearance of the appointment can be customized by using the AppointmentTemplate property of the schedule. It can be used to choose a DataTemplate at runtime based on the value of data bound to a scheduled appointment to customize the appearance of a particular appointment. Appointment customization is applicable for day, week, and workweek views.
Creating different templates for appointments
The following code shows the different templates for all-day and normal appointments.
// All-day template.
<Label
    x:Class="SfScheduleSample.AllDayTemplate"
    >="http://xamarin.com/schemas/2014/forms"
    >:x="http://schemas.microsoft.com/winfx/2009/xaml"
    BackgroundColor="{Binding Color}"
    FontSize="15"
    HorizontalOptions="FillAndExpand"
    HorizontalTextAlignment="Center"
    Text="{Binding EventName}"
    TextColor="White"
    VerticalOptions="CenterAndExpand"
    VerticalTextAlignment="Center" />

// Day appointment template.
<Button
    x:Class="SfScheduleSample.DayAppointmentTemplate"
    >="http://xamarin.com/schemas/2014/forms"
    >:x="http://schemas.microsoft.com/winfx/2009/xaml"
    BackgroundColor="{Binding Color}"
    HorizontalOptions="FillAndExpand"
    Image="{Binding EventName}"
    Text="{Binding EventName}"
    TextColor="White"
    VerticalOptions="FillAndExpand"/>
Choose different templates based on conditions
In the DataTemplateSelector, you can return the desired template conditionally based on the schedule appointment.
public class AppointmentTemplateSelector : DataTemplateSelector
{
    public DataTemplate DayAppointmentTemplate { get; set; }
    public DataTemplate AllDayAppointmentTemplate { get; set; }

    public AppointmentTemplateSelector()
    {
        this.DayAppointmentTemplate = new DataTemplate(typeof(DayAppointmentTemplate));
        this.AllDayAppointmentTemplate = new DataTemplate(typeof(AllDayTemplate));
    }
    protected override DataTemplate OnSelectTemplate(object item, BindableObject container)
    {
        if ((item as ScheduleAppointment).IsAllDay)
            return this.AllDayAppointmentTemplate;
        else
            return this.DayAppointmentTemplate;
    }
}
Assign the previous appointment template selector to the schedule.
<ResourceDictionary>
        <local:AppointmentTemplateSelector x:Key="appointmentTemplateSelector"/>
</ResourceDictionary>
<ContentPage.Content>
     <syncfusion:SfSchedule
            x:Name="schedule"
            AppointmentTemplate="{StaticResource appointmentTemplateSelector}"
            DataSource="{Binding Meetings}">
            <syncfusion:SfSchedule.AppointmentMapping>
                <syncfusion:ScheduleAppointmentMapping
                    ColorMapping="Color"
                    EndTimeMapping="EndTime"
                    IsAllDayMapping="IsAllDay"
                    StartTimeMapping="BeginTime"
                    SubjectMapping="EventName" />
            </syncfusion:SfSchedule.AppointmentMapping>
            <syncfusion:SfSchedule.BindingContext>
                <local:ViewModel />
            </syncfusion:SfSchedule.BindingContext>
     </syncfusion:SfSchedule>
</ContentPage.Content>
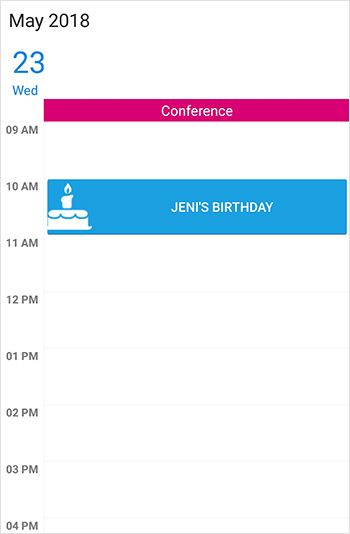
The following screenshot shows the appointment customization done using the previous code.
Restricting navigation based on date
You can restrict the date navigations by using MinDisplayDate and MaxDiplayDate properties. They will prevent swiping using touch gestures and programmatic navigation beyond the minimum to maximum date range.
int monthRange = 2;
DateTime currentDate = DateTime.Now;
DateTime minDate = new DateTime(currentDate.Year, currentDate.Month - monthRange, currentDate.Day, 10, 0, 0);
// Setting minimum display date.
schedule.MinDisplayDate = minDate;

// Setting maximum display date.
DateTime maxDate = new DateTime(currentDate.Year, currentDate.Month + monthRange, currentDate.Day, 10, 0, 0);
schedule.MaxDisplayDate = maxDate;
Globalization and localization
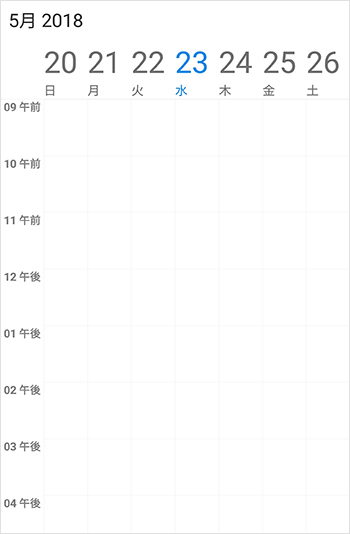
Schedule supports displaying date-time formats and day, week, and month headers for diverse cultures, thus allowing it to meet the various needs of different regions and also supports localizing all static text.
This can be specified by setting the Locale property of schedule. Based on the Locale specified, the strings in the control, such as date, time, and days, are localized accordingly.
<syncfusion:SfSchedule
            x:Name="schedule"
            Locale="ja"
            ScheduleView="WeekView" />
By default, the schedule control is available in the English language.
Date-time header formats can be specified using ScheduleHeaderDateFormat, `DayFormat`, and `DateFormat` properties in corresponding view settings.
<syncfusion:SfSchedule
            x:Name="schedule"
            DataSource="{Binding Meetings}"
            ScheduleHeaderDateFormat="MMMM,yyy"
            ScheduleView="WeekView">
            <syncfusion:SfSchedule.WeekViewSettings>
                <syncfusion:WeekViewSettings>
                    <syncfusion:WeekViewSettings.WeekLabelSettings>

<syncfusion:WeekLabelSettings DateFormat="dddd" DayFormat="dd" TimeFormat="HHmm" />

</syncfusion:WeekViewSettings.WeekLabelSettings>
                </syncfusion:WeekViewSettings>
            </syncfusion:SfSchedule.WeekViewSettings>
</syncfusion:SfSchedule>
Summary
In this blog post, you had a quick overview of the scheduler control, its different views, binding appointments, date restriction, and localization. You can explore other features of this control in the documentation, where you can find detailed explanations of each feature along with code examples. Please feel free to try out this sample and provide your feedback or questions in the comments section.
If you like this blog post, we think you’ll also like the following free e-books:
- Xamarin.Forms Succinctly
- Xamarin.Forms for macOS Succinctly
- Writing Native Mobile Apps in a Functional Language Succinctly


