
Syncfusion WPF input controls allow you to validate user input and display hints if validation fails. If the user input is invalid, a default red border will be shown around the UIElement. This article explains how data validation works in WPF and using built-in validation options such as IDataErrorInfo, INotifyErrorInfo, and ValidationRule while following the MVVM pattern.
We can validate the data in the MVVM pattern using one of the following interfaces:
Using IDataErrorInfo
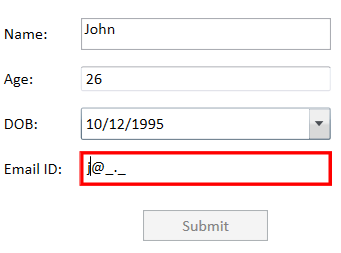
IDataErrorInfo is an interface used to validate data changes and notify the view if there is any error in the data. This error information can be bound to the UI. This interface has two members, a string indicating what is wrong in the object, and a string indicating what is wrong in the specific property of that object. The following steps explain how to implement the form data validation using IDataErrorInfo.
- When the value of the property changes, validate it and store the error information (if any).
public class DataErrorViewModel : NotificationObject, IDataErrorInfo { public DataErrorViewModel() { Name = "John"; Email = "john@hotmail.com"; } private string firstName; public string Name { get => firstName; set { firstName = value; RaisePropertyChanged("Name"); } } private string email; public string Email { get => email; set { email = value; RaisePropertyChanged("Email"); } } #region IDataErrorInfo Members private string _error; public string Error { get => _error; set { if (_error != value) { _error = value; RaisePropertyChanged("Error"); } } } public string this[string columnName] { get { return OnValidate(columnName); } } private string OnValidate(string columnName) { string result = string.Empty; if (columnName == "Name") { if (string.IsNullOrEmpty(Name)) { result = "Name is mandatory"; } else if (!Regex.IsMatch(Name, @"^[a-zA-Z]+$")) { result = "Should enter alphabets only!!!"; } } if (columnName == "Email") { if (string.IsNullOrEmpty(Email)) { result = "Email Required"; } else if (!Regex.IsMatch(Email, "[a-zA-Z0-9._%+-]+@[a-zA-Z0-9-]+\.[a-zA-Z]{1,4}")) { result = "Invalid Email ID"; } } if (result == null) { Error = null; } else { Error = "Error"; } return result; } #endregion } - Bind editor to the required property and set ValidatesOnDataErrors to true.
<UserControl x:Class="Validation_sample.DataErrorView" xmlns="http://schemas.microsoft.com/winfx/2006/xaml/presentation" xmlns:x="http://schemas.microsoft.com/winfx/2006/xaml" xmlns:local="clr-namespace:Validation_sample" xmlns:syncfusion="http://schemas.syncfusion.com/wpf"> <UserControl.DataContext> <local:DataErrorViewModel/> </UserControl.DataContext> <StackPanel> <TextBox Text="{Binding Name, UpdateSourceTrigger=PropertyChanged, ValidatesOnDataErrors=True}" /> <syncfusion:SfMaskedEdit MaskType="RegEx" Mask="[a-zA-Z0-9._%+-]+@[a-zA-Z0-9-]+\.[a-zA-Z]{1,4}" Value="{Binding Email, Mode=TwoWay, NotifyOnValidationError=True, UpdateSourceTrigger=PropertyChanged, ValidatesOnDataErrors=True}"/> </StackPanel> </UserControl> - Allow submission of your form only after all errors have been cleared by disabling the button.
<Button Content="Submit"
        Grid.Column="2" Grid.Row="5"
        HorizontalContentAlignment="Center" Width="100" Height="25"
        Margin="15">
    <Button.Style>
        <Style TargetType="Button">
            <Setter Property="IsEnabled" Value="False"/>
            <Style.Triggers>
                <DataTrigger Binding="{Binding Error}" Value="{x:Null}">
                    <Setter Property="IsEnabled" Value="True"/>
                </DataTrigger>
            </Style.Triggers>
        </Style>
    </Button.Style>
</Button>
Using INotifyDataErrorInfo
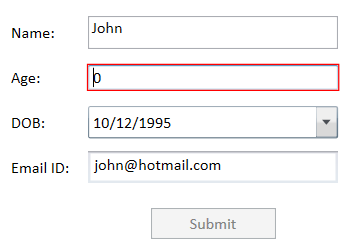
INotifyDataError is also used to validate the data changes and notify if there is any error in the data. This error information can be bound to UI. This interface notifies the view by raising the ‘ErrorChanged’ event. This interface can also show multiple error information for a single property. The following steps explain how to implement the form data validation using INotifyDataErrorInfo.
- When the value of the property changes, validate it and store the error information (if any).
public class NotifyDataErrorViewModel : NotificationObject, INotifyDataErrorInfo { private Dictionary<string, List<string>> propErrors = new Dictionary<string, List<string>>(); private int? age = 26; public int? Age { get { return age; } set { age = value; OnPropertyChanged("Age"); } } #region INotifyPropertyChanged public void OnPropertyChanged(string name) { RaisePropertyChanged(name); if (name == "Age") { ValidateAge(); } } #endregion private void ValidateAge() { ClearErrors(nameof(Age)); if ((this.Age < 1 || this.Age > 100) || this.Age == null) { AddError(nameof(Age), "Age should greater than 1 and less than 100"); } } #region INotifyDataErrorInfo private void AddError(string propertyName, string error) { if (!propErrors.ContainsKey(propertyName)) propErrors[propertyName] = new List<string>(); if (!propErrors[propertyName].Contains(error)) { propErrors[propertyName].Add(error); OnErrorsChanged(propertyName); } } private void ClearErrors(string propertyName) { if (propErrors.ContainsKey(propertyName)) { propErrors.Remove(propertyName); OnErrorsChanged(propertyName); } } public event EventHandler<DataErrorsChangedEventArgs> ErrorsChanged; private void OnErrorsChanged(string propertyName) { if (ErrorsChanged != null) ErrorsChanged.Invoke(this, new DataErrorsChangedEventArgs(propertyName)); RaisePropertyChanged("HasErrors"); } public System.Collections.IEnumerable GetErrors(string propertyName) { List<string> errors = new List<string>(); if (propertyName != null) { propErrors.TryGetValue(propertyName, out errors); return errors; } Else { return null; } } public bool HasErrors { get { try { var propErrorsCount = propErrors.Values.FirstOrDefault(r => r.Count > 0); if (propErrorsCount != null) return true; else return false; } catch { } return true; } } # endregion } - Bind the editor to the required property and set ValidatesOnNotifyDataErrors to true. Set the DataContext of this text box to NotifyDataErrorViewModel.
<UserControl x:Class="Validation_sample.NotifyDataErrorView" xmlns="http://schemas.microsoft.com/winfx/2006/xaml/presentation" xmlns:syncfusion="http://schemas.syncfusion.com/wpf"> <UserControl.DataContext> <local:NotifyDataErrorViewModel/> </UserControl.DataContext> <Grid Name="Grid"> <syncfusion:IntegerTextBox Height="Auto" Width="200" Value="{Binding Age, Mode=TwoWay, ValidatesOnNotifyDataErrors=True, UpdateSourceTrigger=PropertyChanged, TargetNullValue=''}" /> </Grid> </UserControl> - Allow the submission of your form only after all the errors have been cleared by disabling the button.
<Button Content="Submit"
        Grid.Column="2" Grid.Row="5"
        HorizontalContentAlignment="Center" Width="100" Height="25"
        Margin="15">
    <Button.Style>
        <Style TargetType="Button">
            <Setter Property="IsEnabled" Value="False"/>
            <Style.Triggers>
                <DataTrigger Binding="{Binding HasErrors}" Value="False">
                    <Setter Property="IsEnabled" Value="True"/>
                </DataTrigger>
            </Style.Triggers>
        </Style>
    </Button.Style>
</Button>
Using ValidationRule
As well as the interface approaches, which are defined in the ViewModel, you can also define a validation rule and reuse it by specifying the rule in the binding of the required properties. The following steps explain how to implement the form data validation using ValidationRule.
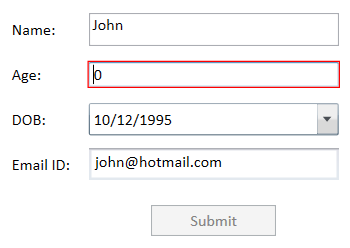
- Validate the data by deriving a class from the ValidationRule class and implementing its Validate method. In this method, you will get the current value and culture information as method arguments. Once data is validated in this method, it returns any error information as ValidationResult, which contains the result and error text.
/// <summary> /// Rule for age /// </summary> public class AgeValidationRule : ValidationRule { public override ValidationResult Validate(object value, CultureInfo cultureInfo) { ValidationResult result = new ValidationResult(true, null); int age; if (string.IsNullOrEmpty(value.ToString())) { result = new ValidationResult(false, "Age is mandatory"); } else if (int.TryParse(value.ToString(), out age)) { if (age < 1 || age > 100) { result = new ValidationResult(false, "Age should greater than 1 and less than 100"); } } else { result = new ValidationResult(false, "Invalid input"); } return result; } } - Then, add the required ValidationRule to binding.
<syncfusion:IntegerTextBox x:Name="age"
                            Height="Auto" Width="200"
                            Margin="5" Grid.Column="2" Grid.Row="2" >
    <syncfusion:IntegerTextBox.Value>
        <Binding Path="Age" Mode="TwoWay" UpdateSourceTrigger="PropertyChanged">
            <Binding.ValidationRules>
                <local:AgeValidationRule/>
            </Binding.ValidationRules>
        </Binding>
    </syncfusion:IntegerTextBox.Value>
</syncfusion:IntegerTextBox>

- Allow the submission of your form only after all the errors have been cleared by disabling the button.
<Button Content="Submit">
<Button.Style>
<Style TargetType="Button">
<Setter Property="IsEnabled" Value="False"/>
<Style.Triggers>
<MultiDataTrigger>
<MultiDataTrigger.Conditions>
<Condition Binding="{Binding Path=(Validation.HasError), ElementName=name}" Value="False"/>
<Condition Binding="{Binding Path=(Validation.HasError), ElementName=age}" Value="False"/>
<Condition Binding="{Binding Path=(Validation.HasError), ElementName=dob}" Value="False"/>
<Condition Binding="{Binding Path=(Validation.HasError), ElementName=email}" Value="False"/>
</MultiDataTrigger.Conditions>
<Setter Property="IsEnabled" Value="True"/>
</MultiDataTrigger>
</Style.Triggers>
</Style>
</Button.Style>
</Button>
Showing error details in a tooltip
To show error information as a tooltip of the editor, bind the tooltip to ‘Validation.Errors’ as demonstrated in the following code.
<UserControl.Resources>
    <Style x:Key="errorToolTip" TargetType="Control">
        <Style.Triggers>
            <Trigger Property="Validation.HasError" Value="True">
                <Setter Property="ToolTip"
                        Value="{
                            Binding RelativeSource={x:Static RelativeSource.Self},
                            Path=(Validation.Errors)/ErrorContent}"/>
            </Trigger>
        </Style.Triggers>
    </Style>
    <Style TargetType="{x:Type TextBox}" BasedOn="{StaticResource errorToolTip}"/>
    <Style TargetType="{x:Type syncfusion:IntegerTextBox}" BasedOn="{StaticResource errorToolTip}"/>
    <Style TargetType="{x:Type syncfusion:SfMaskedEdit}" BasedOn="{StaticResource errorToolTip}"/>
</UserControl.Resources>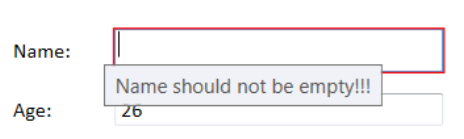
Customizing error template to show errors
By default, you can see a red border that appears if there is any error in the input. You can customize the UI to provide visual feedback to inform the user when an invalid value is entered. We can set the desired error template to show the incorrect date by using the Validation.ErrorTemplate property of UIElement. The following code example demonstrates this.
<Style x:Key="errorTemplate" TargetType="{x:Type Control}">
    <Setter Property="Validation.ErrorTemplate">
        <Setter.Value>
            <ControlTemplate>
                <DockPanel>
                    <Border>
                        <AdornedElementPlaceholder x:Name="controlWithError"/>
                    </Border>
                    <Path HorizontalAlignment="Right"
                            VerticalAlignment="Top"
                            Width="10" Height="10"
                            Data="M0,0 L 1,0 1,1z"
                            Margin="-10,0,0,0"
                            Stretch="Fill"
                            Fill="Red"/>
                </DockPanel>
            </ControlTemplate>
        </Setter.Value>
    </Setter>
</Style>
<Style TargetType="{x:Type TextBox}" BasedOn="{StaticResource errorTemplate}"/>
<Style TargetType="{x:Type syncfusion:IntegerTextBox}" BasedOn="{StaticResource errorTemplate}"/>
<Style TargetType="{x:Type syncfusion:SfMaskedEdit}" BasedOn="{StaticResource errorTemplate}"/>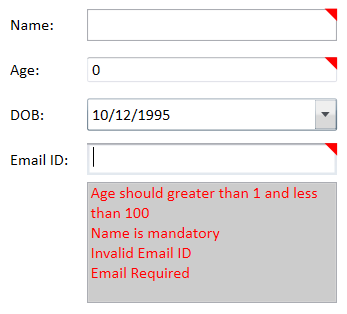
Reference
You can try this sample from GitHub
Conclusion
Syncfusion provides 90+ custom WPF controls such as DataGrid, Charts, Diagram, and PDF Viewer for building powerful line-of-business Windows applications to ease the work of developers.
Several controls, such as Integer TextBox, Double TextBox, DateTimePicker, and MaskedTextBox support error validation. Apart from these input controls, our DataGrid and TreeGrid controls also follow the same standards to validate user input. For more details, refer to the WPF DataGrid Validation and WPF TreeGrid Validation documentations.
If you have any questions, please let us know in the comments section below. You can also contact us through our support forum, support portal, or feedback portal. We are waiting to hear your feedback!


Comments (2)
Does this support Combobox?
Are you asking about WPF framework ComboBox or Syncfusion SfComboBox https://help.syncfusion.com/wpf/combobox/getting-started?
In general both the controls supports data validation.
https://adamprescott.net/2010/09/28/wpf-combo-box-validation/
https://stackoverflow.com/questions/16923922/validate-the-selected-value-in-a-wpf-combobox
https://www.codeproject.com/Questions/501939/ComboboxplusforceplusValidationpluswhenplusnoplusv
If you have any specific query, please post with further details through our
Support forum: https://www.syncfusion.com/forums
Direct-Trac: https://www.syncfusion.com/account/login
Feedback portal: https://www.syncfusion.com/feedback/wpf
Comments are closed.